You Won’t Believe The Trees At Elephant Rocks State Park

This photo by Aaron Fuhrman (Aaron Fuhrman Photography) was taken at the top looking towards the biggest elephant rocks. Click on the photo to visit Aaron’s website and view his beautiful landscape photography.
We recently went to Elephant Rocks State Park, the home of largest round granite boulders and awe-inspiring landscape in the great state of Missouri, for a second time. On our first visit we almost missed the main attraction because we were a little too adventurous. We took a side trail, missed the easy entry to the top, and only found the path up the center as we were leaving. Looking back, it seems almost impossible to do, but we did it. The trees were thick, and we just couldn’t tell where to go. In that case, we should have followed all of the wacky kids that ran up through the trees and disappeared (I guess they had been there before).
On this trip we knew how to get to the big rocks, but started by cruising the perimeter a bit before lunch, and we found even more cool stuff that we missed on the first trip. To the right of the parking lot, the rocks make a nice surrounding for the picnic tables, and are where we started to explore. Once we got up past the picnic tables and started climbing, we quickly went into slow-down-Mira mode, so that she could live to see the rest of the park.
We got Mira to focus, get away from the edge, and stop running and quickly found a quarry pond with steep ledges and more big round rocks, that we hadn’t seen on the first trip. After we were done checking out the new-found area, we headed down for lunch. On the way back down, I noticed for the first time (really noticed) the trees growing on the top of the rocks. I found a dead log and brought it back with me so I could slice it and take a photo. For those of you wondering, all of the signs said don’t take the rocks, they didn’t say a thing about dead logs. Anyway, here is a picture of the unbelievable 28-year-old post oak log. Click on the photo to see what makes it so unbelievable.

This post oak log from Elephant Rocks is about 28 years old. Click on it to see what makes it special.
I knew that it would be a slow grower since it was growing on top of a rock, but it was really slow. The log is a tiny, itty-bitty 1-1/4″ in diameter. At that rate, to grow to a reasonable-sized log for milling of about 18″, it would take 409 years or maybe never even make it. To put that more into perspective, a normal slow-growing tree would have about eight rings per inch. This one had about 40, and so close together that they are hard to see.
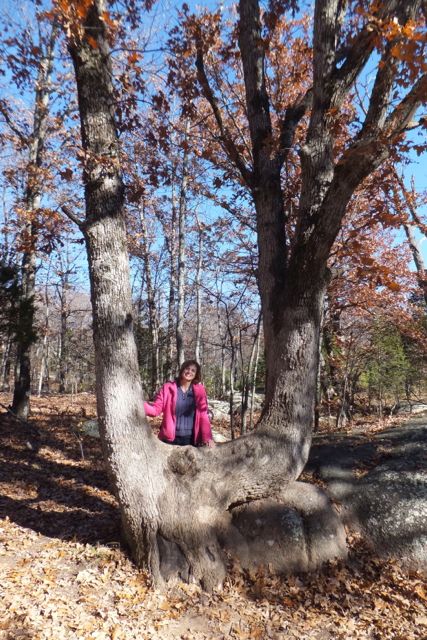
The tree it came from was small and stunted, trying to grow out of a crack in the granite. It looked like many of the trees directly on the rocks. One of them can be seen in the first photo and another is pictured below.

With a trunk diameter of 6″, this 8′ tall post oak is over 100 years old.
A few trees were much larger. Perhaps they were very old or just had more soil to work with, even though they were in a tough spot. I was surprised to see a tree this size in this spot.

This black oak managed to get much larger. Maybe it is 300 years old.
We also found many trees with odd shapes, trying to work their way through the rocks. After this next post oak, I was told to stop taking tree photos and move on by both of my boss’.
This post oak is good for climbing too.
From then on we enjoyed the rest of the park and spent our time climbing on the rocks. We followed the very nice asphalt trail that makes a loop around the rocks and takes you to the top. The following photo shows you the other reason (besides the trees) for going to the top of the mountain. The rocks are unbelievably giant. It is amazing how big the rocks are and that they don’t just roll down the hill. By the way, that is not my family.

This is the biggest rock at Elephant Rocks. Courtesy Aaron Fuhrman Photography.
This is how the rest of the park looked when we visited on November 10th:
-

- Even the smaller rocks at the top are big.
-

- Though covered in leaves, there is a nice asphalt path around the park.
-

- This is the quarry where the pink granite was removed.
-

- The rocks on this side invite visitors to sit on the different levels and enjoy the view.
-

- Elephant Rocks has plenty of spots to squeeze and crawl through.
-

- This is from the top looking down the mountain. The entire slope is a big chunk of granite, with round granite boulders on top.
-

- You can’t go to Elephant Rocks and not take a photo holding one up.
If you have never been to Elephant Rocks, I highly recommend that you go. If you have been there before, I highly recommend that you go again. It is truly amazing, and at about 1-1/2 hours south of St. Louis, worth the drive.
Below are a few notes that I put together after just two trips to Elephant Rocks. If you have been there before, feel free to add your own in the reply section.
Notes for visiting Elephant Rocks:
- Granite gets warm. The park has lots of shade from the trees, but the open spans of granite get toasty in the sun.
- Plan to stay awhile. The path around the park is only a mile, but there are lots of things to see and explore.
- Bring a lunch. There are many nice picnic tables around the parking lot, all situated among trees and rocks.
- Be ready to climb. The entire park is open to be explored. Older kids (and some adults) will be jumping from rock to rock, rock climbers will be honing their skills, and parents of little ones will be very nervous. Even so, there are plenty of places to safely explore close to the ground.
- Granite is slippery. Some spots are well worn, polished and smooth. Don’t be afraid to get down on your butt. You will end up there anyway.
- Bring your camera. You will definitely need a photo of yourself holding up a giant rock.
-

From this point head straight up through the trees to the big rocks.
Don’t miss the biggest rocks. At the bottom of the hill and the entrance to the loop Braille Trail, is what I will call the “foyer” of the park. At this spot, which has a single rock with a ring of asphalt around it, you can head directly into the trees and up the mountain. It is not marked as a trail or a path, but others will most likely be headed through this passage. This is the spot we missed the first time because it is not identified at all, especially compared to the very nice trail that heads away to either side. When there are no leaves on the trees the path will be obvious. Otherwise, just trust me and head up the gut to the top. Do note that heading up the center is on the granite rock and not on an asphalt path. It isn’t too hard to climb, but it isn’t for everyone. If you think you might have trouble climbing the rock, just follow the main trail around the back and to the top. You will end up in the same spot.

Lose The Sandpaper, Grab The Razor

Hold the razor almost vertical and then lean the top the direction that you push. After about 3 seconds you will get the feel.
One of the best finishing tips I’ve ever picked up came from an episode of “This Old House”. Norm and Tommy were building some cabinets for a house, and they were spraying a lot of plywood. They showed how they used a razor as a scraper to knock off the nubs between finish coats. It looked simple, so I gave it a go, and I haven’t looked back since.
Let me first start by saying that the razor isn’t perfect. It is flat and straight, so it doesn’t work for profiled edges or rustic, wavy surfaces, but it is great for big, open flat spots. I use it most often on sheets of plywood, but also use it on the flat spots of doors, including the stiles and rails.
The beauty of the razor is the simplicity and speed. With one razor blade, I can quickly smooth a surface between coats on a job that would eat up several sheets of sandpaper. The big difference is that the razor doesn’t clog up with finish like sandpaper does, it just scrapes off the high spots. This is especially helpful when I am trying to finish a job in just one day (which is usually the case). As long as the finish is set up enough to handle, I can start scraping with a razor and never have to stop. In the same scenario with sandpaper, it would clog almost immediately causing me to use more sandpaper and not get consistent results. The clogged sandpaper also tends to drop off little boogers of coagulated finish that stick to the surface. That never happens with a razor.
Using the razor is simple. Hold it up nearly vertical to the surface, lean the top into the cut and pull or push the direction you want to go. It works just like a cabinet scraper, only on a smaller scale, and it doesn’t need to be sharpened. When the razor is dull, just grab another one and move on. I often flip the blade around and cut the opposite direction to make the edge last even longer. If it feels like it isn’t cutting, flip it around. If it still isn’t cutting, just grab another one and get back to work.
Quick tips for using a razor:
- Make sure the finish is dry before scraping.
- Make sure runs are super dry before scraping. The finish should scrape off in shallow layers, not rub off in big chunks.
- Always use a new razor. Old razors can have nicks that scratch the finish.
- Use a razor on flat surfaces. Razors do not work on profiled edges.
- Watch the sharp corners. The corners of the razor can easily scratch the finish.
- Use a light pressure to start. Apply more pressure as you get more comfortable.
If you are going to be doing a lot of scraping, I highly recommend wearing gloves or putting tape on the top of the blade to serve as a handle. The blade gets hots and starts to dig into your hand during heavy use, so it is best to make it as comfortable as possible. There are plastic blade holders commonly available as well. They work fine, but they got lost easily. It seems like I can always find the blades (mostly because they came in a jumbo pack), but I can never find the holders.
As I mentioned, the razor is great for flat surfaces, even curved, flat surfaces (what?). Yep, that’s right, the ol’ curved flat surface, like the belly of an arch. The razor will work on a surface like this, as long as it can sit flat. You can still follow the curve by changing the angle of the blade and quickly scrape the surface.
The razor is not a good choice for profiled edges. First off, it often can’t reach where it is needed, and secondly, there is a great risk that one false move might destroy an edge. In this case, sandpaper or a Scotchbrite pad is the poison to pick.
I use the razor between coats of sanding sealer and even topcoats, when necessary. It makes for a speedy job and a quality one at that. The razor takes off only the highest finish, which is usually just dust nibs and other loosely clinging items (like the legs of flying insects). And, with a little extra pressure a razor will dig in deeper to help remove runs and other problems, like finger prints, smudges, etc.
When you use a razor for scraping a finish, watch the edges of the razor and your pressure. The edges of the razor are sharp and can easily leave an errant scratch. Use a light touch, so if you bump the edge into something it won’t plow a line through it. The lighter pressure also ensures that you don’t take off any more than the imperfections. Only apply more pressure after you get the hang of it and when you really need it.
Lastly, make sure to use only new razors. A razor that has even just one ding in it will scratch up the surface, and the scratches won’t show until the next coat is sprayed. Don’t be a cheap skate and try to stretch the blades you have. Buy a pack of 100 and rest easy knowing that you will use all of them, either for scraping or in a knife.
Using a razor on your newly applied finish will seem scary at first. Go slow, use light pressure and be careful. In just a few minutes you will get used to the feel of it. As you work, use your hand to feel the progress along the way, by rubbing the surface to feel for imperfections. Your hand will tell you what you’ve missed and where you need to work a little more. Give it a try, and after just one swipe of the razor, I think you will be hooked.
What’s Going on at WunderWoods

Everyone always asks what I do. Here's the answer. Click on the photo above for a short video tour and see all of the steps it takes to go from a tree to finished furniture.