Multiples Stack Up or Measure Up (you pick)
I am a woodworker, and as a woodworker I live by a certain set of norms which dictate that I be accurate, but not ridiculously accurate. After all, wood changes size all of the time, so there is a limit to how accurate we can be and how much we should really worry about it. For most of us, a few measurements in a job are critical and the rest of the pieces are fit to look good. We may use measurements as a jumping off point, but it isn’t uncommon to trim a bit here and plane a bit there.
When I am in the shop, I always have a tape measure hanging off of my pocket for anything that needs to be measured. I use it a lot, but mostly for rough measurements, like making sure a piece of wood will be big enough for what I have in mind. I also use it for more critical measurements, but I try my best to find ways to not use measurements when things start to get critical. For example, instead of measuring, I will use a scrap piece of wood as a spacer. That way I don’t need to worry every time about reading the tape measure wrong, and I know that all of my spacing will be very consistent.
As much as I try to avoid being fussy about my measurements, sometimes they need to be a little more accurate. One of the tools where accuracy is important is the planer. If I want 1″ thick wood, I want to know that it is 1″. Now, more engineery people might reach for their calipers, but for those of you like me, with only a tape measures on your belt, I have a very accurate way to make perfectly sized parts – just stack them up.

The target for this table saw run was 1″. The samples from the cut were close, especially the one in the middle, but adding all of them up confirms that they are a bit wide.
Here’s the logic. If your measurements are just slightly off, you may not notice it in just one piece, but as you add up the pieces you also add up the differences and they become much more obvious. Just run a scrap piece of wood through the planer, chop it into 3, 4 or 5 pieces, stack them up and measure them. 5 pieces of wood that are 1″ thick should measure 5″ – simple de dimple. If your 1″ thick board isn’t exactly 1″ thick, you will see it, even without calipers, and then you can adjust the thickness.

That’s better! Three pieces measure 3″ wide. The average is 1″. Let’s run some parts!
The beauty of this system is two-fold. First off, you don’t need to worry about having calipers (after all, those are for kids that work at Boeing and have really clean floors). Second, it gives you a more accurate real-world reading of what is coming out of your machine. We all know that a board coming out of the planer has dips and doodles in the wood and can range in thickness depending on the spot that you measure. Adding up several pieces of wood gives you not only a measurement that is accurate, but it is also closer to the average. We are only talking small amounts here, but if you are setting up to plane a bunch of lumber, it is great to know what the bulk of it is going to measure.

When running enough wood through the planer to make thousands of little sticks with thousands of little spaces, as in this wine cellar racking, accurate tool setup is critical and easy to verify by stacking up multiples.
I use this system to double-check measurements on other tools as well. It works great on the table saw to make sure that your 3″ wide board is really 3″. Instead of cutting just one sample board 3″ wide and determining that it looks really close, cut 3 or more and add them up. Assuming that you can do a little simple math, you will be able to tell if the 3″ mark is consistently spitting out 3″ boards and not 2-63/64″ boards.
When using my fancy measuring shortcut, there is one important rule to follow. Make sure the tongue on your tape measure is accurate or don’t use the tongue at all. If you don’t trust the tongue on your tape measure then take a reading starting at the 1″ mark to check the distance and then just subtract 1″ from your reading (and then hope that a holiday is quickly approaching that might lend itself to the arrival of a new tape measure).
How Much Lacquer Thinner Should I Use?
Today, I was having a conversation with one of my customers about spraying a conversion varnish (Krystal, from M.L. Campbell) and the problems he was having with getting it to lay down nicely after it was sprayed. He said that he applied is wet enough to blend together and not be rough, but that he had a lot of orange peel in the finish. After discussing the possible causes of the orange peel it became obvious that he needed to add lacquer thinner to the mix, which he did not do.
This customer is new to spraying conversion varnish, which is a two-part mix that sets up and hardens chemically like epoxy, forming a super durable finish. The information on the can talked about the 10:1 ratio of finish to catalyst, but apparently didn’t mention a thing about thinning with lacquer thinner, so he used none. Even if it was mentioned, I assume that he was worried enough about getting the ratio correct (click here to learn how to easily get the proper mixing ratios) and not messing up the mix that he never imagined he could, or even that he should add lacquer thinner.
In this case, my customer was getting orange peel because the finish was too thick for his two-stage turbine. The kids at the finish distributor led him to believe that he shouldn’t need to add thinner, but they did not ask about the power of his spray equipment, assuming that he probably had a turbine strong enough to finely atomize the finish without thinning.

This Graco 2-quart pressure pot system I currently use is an older 2-stage model, but gives good results with proper thinning.
I continued to discuss the need to add thinner with my customer, and pointed out that a non-thinned finish requires more turbine power than he currently has. If he owned a 4-stage or 5-stage turbine, he could probably use the finish without thinner, but not with just a 2-stage. I speak from experience on this one, because my everyday gun is an older 2-stage model, and it requires at least a bit of thinning on almost everything I spray. I am okay with this apparent shortcoming because I am a proponent of applying multiple thin coats, as compared to fewer thick coats, which I believe are just inviting trouble.
As our conversation continued, he asked the million dollar question, “How much lacquer thinner do you add?” For me, the simple answer is, “Until it sprays good,” which is very ambiguous I know, but true. I have an advantage because I have sprayed more than him and I have an idea where I am headed, but I don’t truly know until I shoot a sample board with it and see how things are flowing (which I do every time before I spray the real thing). I spray a sample piece of wood standing up vertically to make sure that I can get a fully wet and flat surface with no runs or sags and to get a feel for how fast I need to move the gun to make all of that happen. If the sample surface looks good, I move on and spray the real thing. If I have issues, it is usually because the finish is a bit thick, so I add lacquer thinner until the finish sprays smoothly without orange peel and without runs.

A viscosity cup like this Ford 4 style, available from Highland Woodworking is a good starting point.
Another, more technical way to determine the correct amount of thinner is to use a viscosity cup. A viscosity cup is shaped like a funnel and determines how thick a fluid is by the time it takes to empty the cup. A thin fluid will empty in just a couple of seconds, while a thick fluid might take 30 seconds or more. When I started spraying and used a viscosity cup, about 15 seconds was the right amount for my gun, but it will vary from gun to gun. When learning to spray, I recommend using a viscosity cup and to follow the manufacturers recommendations. If nothing else, this will give you a good starting point from which you can make later changes and have a way to achieve consistent results. After you spray for a while, there will be less mystery, and you will know from one test shot what needs to be adjusted, even without the viscosity cup.
When my customer asked about adding lacquer thinner, I know he was worried about possibly adding too much, and after thinking about it, I don’t know that you can add too much. I can follow the logic that adding too much thinner may change the chemistry, but I mix the 10:1 ratio of conversion varnish to catalyst first and then add the thinner, so there should still be the same amount of resin and catalyst, just with more space between them, in the form of lacquer thinner which will quickly evaporate and let the two parts do their thing. Even with other lacquer products, which includes sealers, nitrocellulose lacquers and modified lacquers, I can’t think of any time that I have ever had a problem because I added too much thinner.
I’m sure finish manufacturers would disagree and warn you to not be so cavalier about it, but I sure wouldn’t worry about adding too much thinner. Simply add enough thinner until your spray gun is able to apply a nice, even and wet film that flows out flat and dries without sagging. Even if you do mix it a bit thin, feel confident knowing that you can always compensate by moving more quickly or reducing the amount of fluid coming out of the tip of the gun.
Today’s Glues are Super Strong
When customers stop by to peruse the lumber and slabs I have for sale, they inevitably end up near the back of my shop, where I do my woodworking. They like to see what I am up to and discuss woodworking in general. Lately, I have been making a lot of live-edge tops, so I usually have at least one being glued up, and I can guarantee you that the first question is going to be, “What do you use to join those two pieces of wood together?” They are expecting a dramatic answer full of technical jargon, like tongue and groove or sliding dovetail or dominos or even biscuits, but I always disappoint them and just say, “glue”. I like to say it in a sort of caveman fashion for dramatic effect and a bit of humor, but then I quickly jump in and fill the awkward silence with a more detailed explanation, especially since I can tell that just blurting out the word “glue” isn’t going to be enough.
I use Titebond original wood glue with the red cap. There is Titebond II and III for more water-resistency, but I usually stick to the original unless it is a project that is prone to getting very wet. I like that the original cleans up easily with water and that even dried glue can be soaked and removed from brushes and clothing. I don’t prefer Titebond for any special reason, except that it is widely used and widely available. I would just as confidently use other name-brand wood glues and expect similar results.

I use Titebond original wood glue (with the red cap) and clamps on sawhorses. For big tops, I ditch the sawhorses and just use the floor.

Spectrum Adhesives MG-1000 industrial-grade PVA glue is all they use at Goebel and Co. Furniture (along with a JLT clamp rack) to assemble panels and tops like these.
The glues available today are strong, super strong, stronger than the wood itself. To prove this, I always save the end cuts from my glue-ups, so I can break them later for demonstration purposes for customers and inspection purposes for myself. If the glue is fully dry (results are not guaranteed if the glue is still wet), the glued-up scraps will always break somewhere in the wood. Even if it does happen to spilt close to the glue line, there is always plenty of wood stuck to the glue to make anyone doubting the strength of the joint to become a believer.
In comparison, I have worked with plenty of reclaimed wood, especially old oak church pews, that have a tendency to split along the glue joints. When closely inspected, it is clear that the old glue had become dry and brittle, and though it stuck to both surfaces, the glue itself broke down, like old plastic that has been outside too long. Most likely, the older glues, while strong at the time, weren’t formulated correctly to stay flexible over time. Current glues are formulated to hold strong and not break down during regular indoor use. Note that I wrote “indoor” use – for outdoor use, all bets are off. From extreme wood movement to glue breakdown, there is simply too much wear and tear outdoors for the glue to hold a jointed edge together on its own without any eventual failures.
So, we know that the glue is strong and is more than capable of holding a joint together, but just how strong is it? There is probably some value on some fancy scale to tell you exactly how strong the joint is, but it doesn’t really matter, as long as you know that it is stronger than the wood. At that point, to know the strength for sure, you would need to know the strength not only of the wood you are working with, but the weakest point in any given spot in a board, which you just can’t know, so I say stop worrying about it. Just know that it is more than strong enough to do the job.
Now, for the glue to work correctly, your machining and joints need to be reasonably good. I say, “reasonably” good because I think there is a lot of wiggle room here. Obviously, if everything is perfectly square and straight, there is no question about your joint integrity. You can simply coat the joint with glue, apply just enough pressure to pull everything together, and you will end up with a strong, wonderfully impressive joint. But, what if your jointed edges are square but the boards are long and have a bit of a bow and they will require a bit of extra clamp pressure to pull them together, is that gonna work? Heck yeah! Did I mention the glue is strong? A little extra clamp pressure is fine.
What about a lot of clamp pressure? Now this is where the “reasonably” good part comes into play. I say if you are doing a glue-up and you feel like you have applied so much pressure to pull things together that it just feels wrong, then you should probably work on the joint some more. But, here’s the kicker. I can tell you that I have been involved in more glue-ups than I should admit to that have required an inordinate amount of clamp pressure, and to this day (knock on wood), I have never had a joint fail. Maybe I have just been lucky, since I have done tons of glue-ups, but I use this as a real world testament to the strength of the current glues.
The problem with needing a lot of clamp pressure to pull joints together is two-fold. The first issue is that there are built-in forces that are always trying open the joint with the same amount of pressure it took to close up the joint, which can be significant. The other issue, and the one that is commonly more worrisome, is that more clamp pressure means less glue in the joint. The concern being that if all of the glue is squeezed out then obviously there is nothing to hold the wood together. As far as I can tell, especially since I have not had a failure yet, is that this isn’t easily accomplished. I am not saying it isn’t possible, but it isn’t easy. Many woods have open pores that will hold glue no matter how much pressure you give them (think oak and walnut), and if you are fighting at all to pull a joint together, that means that somewhere along the line things are loose enough to hold some glue. Sure, it might completely squeeze out in one spot and make the joint a bit weaker, but in other spots the glue will hold like it is supposed to and keep things from coming apart.
With all of this cavalier talk about crappy joints with extra clamp pressure, you still have to show some restraint. There are going to be times when you can’t rely on just the glue, no matter how strong it is, to hold everything together and you will need to rework your joints for a better fit. A couple of instances come to mind. Some woods have very tight grain that is smooth and won’t hold much glue (think hard maple), so it is possible to end up with a joint that has almost no glue in it. The second instance where more jointing work will be required is if the boards are tight in the middle and loose on the ends. The ends are where a top will want to naturally split, so trying to use extra pressure in this case, is inviting an issue down the road. I feel a million times more confident closing up a gap in the middle of a glue-up than I do the ends, knowing that the entire joint is holding things together, not just the glue on the ends.
One last category that requires a little extra attention is exotic wood. Some have oils in them that just won’t glue properly. They need to be cleaned with lacquer thinner before gluing to provide a good surface and they are often extra hard, so they don’t absorb much glue. I have had problems with bloodwood in the past, which fell apart during my initial tests because I had not cleaned the wood enough. To be safe, I cleaned the wood even more and roughed up the surface a bit with sandpaper to give the glue something to grab. Before the sanding, the edges were just too hard and too smooth. Since then, the extra hard and oily exotics scare me, so I would never force a glue joint with them. I trust the current glues a lot, but there are limits.
Assuming that you have decent joints and wood that will accept glue, all you have to do is make sure that both surfaces are coated with wood glue and clamp them together until the seam is tight. That is really all there is to it and all that is done at almost every professional shop I can think of. You don’t need any special tricks at all, just “glue,” I remind you in my caveman voice.
Factory Cart Bench
I have been through a lot of factory carts in the past couple of years, all of which have been repurposed into coffee tables. Things changed a bit when we built our first factory cart bench. It came about when a customer that wanted to have a bench made sent me some pinterest photos and one happened to have industrial cart wheels on it. That was a gimme for me because I happen to have in my possession about 50 carts that are already bench height.

This is our official, first-ever factory cart bench.
We started by trimming the whole thing down from 28″ to 19″ in depth and cleaning all of the hardware. That was followed up by building the back and armrests out of wood we saved from other disassembled carts. After a little distressing around the new cuts and a light sanding overall, we stained all of the hard maple with a medium-dark brown stain before spraying a lacquer finish on the entire cart, including the hardware (I prefer the look of the hardware with a clear coat as opposed to black paint).
When the bench was almost finished, I told Chris (my wife) that I think we might need a factory cart bench in our house. She asked how much I charged for it and she then advised me that it would look much better in someone else’s home. I guess that is how it goes at the cobbler’s house too.
2014 Woodworking Projects
I am terrible at remembering to take photos of my projects. I usually tell myself that I will take the pictures next time since the job isn’t officially done yet, or the background doesn’t look great, or my shop looks like it houses six families of hobos, but when the job is unceremoniously complete, I set off for my next one without even a snapshot.
In an effort to prove that I actually do work every now and then, I have pulled together a quick photographic rundown of 2014. Some of them you may have already seen, some are new, and yes, some are still missing (just imagine all of the other swell things that I did that aren’t included).

This antique reproduction table was a little tricky to make. The smaller legs don’t leave much room for joinery.

This nightstand features whitewashed rustic cypress with lots of character.

My customer said to do whatever I wanted on this one, and I did. This spalted maple log wasn’t wide enough to make a one-piece top, so I made a three-piece top with the curved slabs. The top is shaped like a football with the ends squared off. A glass insert in the middle will finish off the top.

A cute little nightstand for a little room.

This round dining table is made of American elm (one of my favorites). While a bit cantankerous to work with, it yields beautiful results.

About 150 of these carts have made their way through my shop. Luckily, I didn’t have to refinish all of them like I did this one.

I used every durable wood I could think of for this play structure. Osage orange, cedar and white oak all teamed up for this preschoolers playground.

My daughter inspired my first official driftwood project with her mermaid-themed swimming party.

This mantel was milled from a piece of driftwood and the fresh cuts were stained to match the gray exterior.

Dark-stained cherry and iron (aged like a man) worked together to create a focal point for this new kitchen.

This contemporary TV wall is a slight departure from my normal projects since I didn’t mill any of the lumber. It is built from natural maple plywood and red oak plywood stained black.
Here’s to a new year of great projects and remembering to take more photos! Happy New Year!
What is Going on at WunderWoods?
On a semi-regular basis I talk to someone who would have used me for their last project, but they didn’t because they didn’t know everything I do. My woodworking customers don’t know I mill lumber, my milling customers don’t know I sell lumber, my lumber customers don’t know I do custom woodworking, and I blame it all on my inept advertising department.
I am here to change all of that with a new video that shows what is really happening at WunderWoods (when I am working). With the help of a few of my customers, I have put together a montage of the goings on in a three-week span of my daily work life. The clips are chronological in order, but random in their approach. One day I cut a tree, the next day I finish a piece of furniture – just like real life.
The bottom line is that if it involves wood there is a good chance I do it.

Click to watch a short video and see what really happens at WunderWoods.
Thanks to Dwayne Tiggs from Crafty Naturals, Jermain Todd from Mwanzi, and Martin Goebel from Goebel and Company Furniture for starring in the video.
The following photos are of the finished products shown in progress in the video:

Elm is one of my favorite woods. In this case, we used all of the tree, including some big knots with lots of spunk.

After seeing other cricket tables that the customer liked, she ordered this walnut version in a bit smaller size. The top is 23″ in diameter.
The Kreg Jig: Is It Real Woodworking?
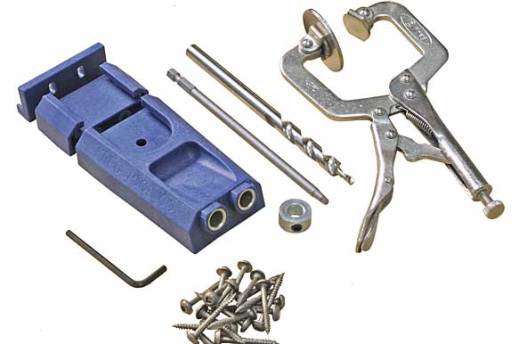
I am finally willing to admit it – I use a Kreg jig. I use it regularly and I like it. I don’t use it everywhere, but I am finding more uses every day, and it scares me a little. I am a woodworker, a custom woodworker. I use time-honored joinery like mortises, tenons and dovetails. It doesn’t feel right to add the Kreg jig to the list. I can’t and won’t do it. It isn’t real woodworking. Or is it?
I haven’t decided, officially. Used in the right places it is totally acceptable in my mind. For face frames, nothing is faster, the joints are tight and, with a little glue added, strong and stable. And, since the face frame is joined to a cabinet box it gets extra help in the support department to keep everything in place. So, it’s fine on face frames. What about the cabinet boxes that the face frames attach to?

The “Rocket” is the Kreg jig that I use.
I say O.K. The boxes get support from the walls and I use regular screws all the time, so pocket screws must be acceptable (as a footnote, I like to screw cabinets together when possible, so that I can take them apart for “design changes”). Face frames, check. Cabinet boxes, check. What about furniture? Maybe something very much like a cabinet or cabinet box, just not attached to the wall? Now, it starts to get really murky. Officially, out loud, I say no way. Furniture must be assembled with furniture joints, not pocket screws. Then I ask myself why and I don’t have a great answer except that it doesn’t feel right. Assuming that the pocket screw joint is just as strong as a “real” woodworking joint it shouldn’t really matter, but it does. I feel if I take the quick and easy way out, I am less of a woodworker. I can’t get past it.
Here’s the thing that is odd to me. I think that the Kreg jig works great and all of their products (at least the one I have used) are top-notch. I, especially, like their screws. It may not seem that important, but their screws are the best. I use them whenever I can, even when I am not using pocket holes. They never strip out or break, and they are self-tapping. Their drill bits are well made and stay sharp for a long time. When I was working on opening my new shop, Kreg products were the first ones to come to mind to have for sale. It’s clear that I like them, but I still think, in the back of my mind, that they aren’t for real woodworkers.
To this day, I will make sure that the Kreg jig and screws are always with me, but I won’t always use them. Weird?
What do you think? Please leave a comment.
What’s Going on at WunderWoods

Everyone always asks what I do. Here's the answer. Click on the photo above for a short video tour and see all of the steps it takes to go from a tree to finished furniture.