Installing Live-Edge Floating Shelves in a Corner (and Wall to Wall)
Floating is pretty much the only way we install shelves anymore. We could install them other ways (you know, with brackets), but nobody wants brackets anymore. So, you might ask yourself, “If the only installation being requested these days is floating and the kids at WunderWoods install a lot of shelves, why was was it so hard for Scott to figure out how to put live-edge shelves in a corner?” Seems like he might have run into that before. The crazy answer is, no, I have not run into it before and no one has ever asked.
If you don’t give it a lot of thought, it doesn’t seem too much more difficult than a regular floating shelf installation. However, I was starting to think it was impossible (especially wall to wall) until I dreamed up a way to do it months after the initial request. While I was working on it and letting this part drag on, I remembered thinking, “I wonder how long it will be before brackets come back in style, so I can put up these corner shelves?”
My first, and only other plausible solution, was to install the rods and drill the holes at a 45 degree angle from the corner and slide the entire assembly (both shelves together) into the corner. This would technically work, if the corner is open, but it wouldn’t work if the corner was closed in on the ends and it sounded ridiculously hard to drill and install. It pretty much would never work. That was it. That was all I had for a long time.
I kept thinking about regular shelves and how nice it would be if I could just drop it on some shelf pins, or how nice it would be if they were just square-edged shelves and I could slide them in without fussing with that inside corner where the live edges crash at some random angle. Then, finally, I put the two ideas together. Slide the second shelf in at an angle on a post and drop the other side down into a funky joint on the other shelf. It is a tough one to explain without me being able to use my hands, so I put an animation in the video for you to see how it works.
Overall, the installation is the same as we do for live-edge mantels (click to see how to install a live-edge mantel) and other live-edge shelves. We do sometimes use Sheppard brackets, but they wouldn’t work in this case either. The main difference for this installation was the inside corner, which was cut on the CNC router. It’s a fun little joint which we cut quite often but with the addition of a little ledge. Check out the following video to see how it works. It’s a lot easier than me trying to explain it.

Old Orange Kitchen Cabinets Get Updated
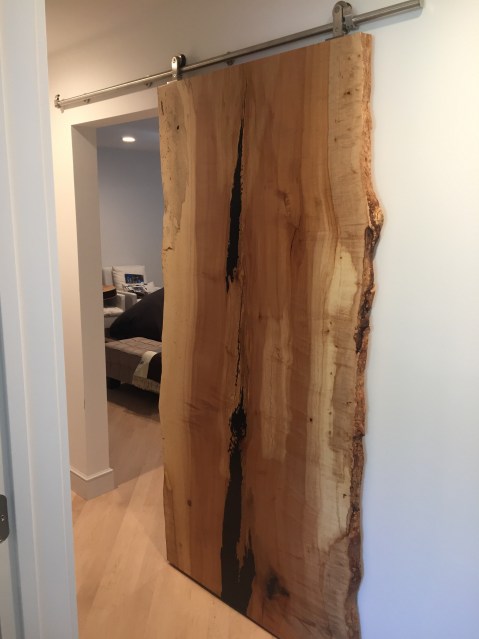
We recently delivered a live-edge maple slab door to a customer and there was a lot of talk about making sure the maple wasn’t too yellow. She had her maple floors refinished as part of her house remodel and she was worried about the color of the new maple door. It wasn’t too much of an issue because the maple slab had an array of colors, including black epoxy, but when we were installing the door it became clear why she was worried about the color. Turns out she had a kitchen full of maple cabinets which had turned amber orange over the years and now clashed with the refinished maple floors.
I saw what she saw – bright white, newly and expertly refinished maple floors underneath old, crusty and orange maple cabinets. The cabinets were still in decent shape but they definitely needed some help to not look so old. She picked the right day to ask if there was anything that could be done about the color because I was riding high from a successful install of a very cool door and there was no way I was going to act like I couldn’t do it.
I wasn’t sure exactly how I was going to go about it, but I knew it would start with sanding. And, since everything in the kitchen, including the crown moulding was made from maple-veneered panels with an mdf core, I spent a lot of time very carefully sanding. After I had my parts sanded to an even and much lighter color, I started to apply the Raw Sealer finish from Basic Coatings. I chose this finish for one main reason, and that is because it is the exact same finish the flooring company used. I could have used another water-based finish with a white additive, but I figured why fight it? Use what they used on the floor and I should have the best chance of matching it.
The Raw Sealer has a very small amount of white added to it and I found that I wasn’t getting enough white in the finish until I was up to about six coats on my test pieces, so I decided to add some more white. I added enough white latex paint (about two tablespoons per quart) until the finish was the right amount of white in two or three coats instead of six. The white paint added brightness and covered the yellow orange of the maple, and it will work to retain the original color since the paint won’t yellow. It worked like a white wash for the cabinets and really did the trick.
The most difficult part of the job, besides the tedious sanding, was applying the finish with the white added. It needed to be applied evenly, so I needed to make sure my gun was working great and so was I. There were a few times where the color didn’t look too even or the gun sprayed a little wacky, but I was able to quickly wipe that panel off with a wet rag before the finish dried and reapply.
I spent a lot of hours on this job (more than budgeted, of course), but I think it came out great and I might even be convinced to do it again someday in the distant future. Click on the video link to see what I started with and how it all ended up.
Siberian Elm Live Edge Slab Table Top #1
I have been cutting a lot of slabs lately and building a lot of tops. This is the first one that I have finished out of a big double-crotch Siberian elm that I milled in the spring. The top is 36″ at the narrowest and 58″ at the widest. The slab was milled 3″ thick and was flattened and finished with a hand-planed surface at 2″ thick.
For those of you that haven’t heard yet, Siberian elm is one of my favorites. The wood needs nothing added to it to make it beautiful – just a clear top coat (actually four coats of Klearvar) is all it takes. The wood for this top is a delicious medium brown with tons of visual interest, especially where the main trunk splits into three branches.
The wood slab and the steel base (built by Commercial Fabrication) are going to serve as a 42″ bar-height community table in my customers newly remodeled basement.

The first of several Siberian elm slabs to get finished.

A little bit of finish and a closer look shows the character of Siberian elm.

Siberian elm log being processed on the Lucas mill with slabbing attachment for logs up to 64″ wide.

Freshly milled Siberian elm slabs.
Martin Goebel Has Big Plans

Martin likes big logs too.
About a week ago we milled a big Black Oak log for our friend Martin Goebel of Goebel & Co. Furniture. It looks like he has some big plans, and they include a large tabletop for a customer. Our mission was to get at least one good slab, cut at 4″ thick, that would stay together through the drying process. The log was stout with a lot of character and a few bad spots, but it was so big that getting some slabs that met the requirement was no problem.
This is the first log that I have milled on the Lucas Mill that required the mill to be jacked up (by about 10″) to get started. The mill will cut up to 62″ wide with the chainsaw slabber attachment, and we still had to trim both sides of the butt end for the log to fit. We milled the bottom log with the slabber, and Roger Branson of Red Rooster Sawmill cut up the top logs on his Wood-Mizer LT40. In all we got about 1,600 bd. ft. out of the tree, with about 1,000 bd. ft. coming out of the bottom 10′ log.
Here are the photos of the event:

Even with the mill jacked up and elevated as high as it would go, the log needed to be trimmed for the mill to work.

After we got a level work surface, it was easier to work on top of the log.

This is a manual mill and needs to be pushed through the cut. To speed things up, Scott helped Dan push the mill.

This is the natural-edge slab Martin picked out for the tabletop. It is just over 10′ long and 5′ wide on the end with the trimmed sides. It was cut 4″ thick and will take over a year to dry, even with the help of a kiln. There are a couple of spots that Martin sealed up to help prevent large cracks. Overall, an impressive piece of wood.
After the milling we got all of the wood back in the shop and stacked to start drying. It is nutty to know that the lumber is so big that it takes two of us just to slide one end of the slab on to the sticks. Luckily, the stacking is done, and now we wait, with our fingers crossed, in hopes that nothing breaks as it dries.
What’s Going on at WunderWoods

Everyone always asks what I do. Here's the answer. Click on the photo above for a short video tour and see all of the steps it takes to go from a tree to finished furniture.