Old Orange Kitchen Cabinets Get Updated
We recently delivered a live-edge maple slab door to a customer and there was a lot of talk about making sure the maple wasn’t too yellow. She had her maple floors refinished as part of her house remodel and she was worried about the color of the new maple door. It wasn’t too much of an issue because the maple slab had an array of colors, including black epoxy, but when we were installing the door it became clear why she was worried about the color. Turns out she had a kitchen full of maple cabinets which had turned amber orange over the years and now clashed with the refinished maple floors.
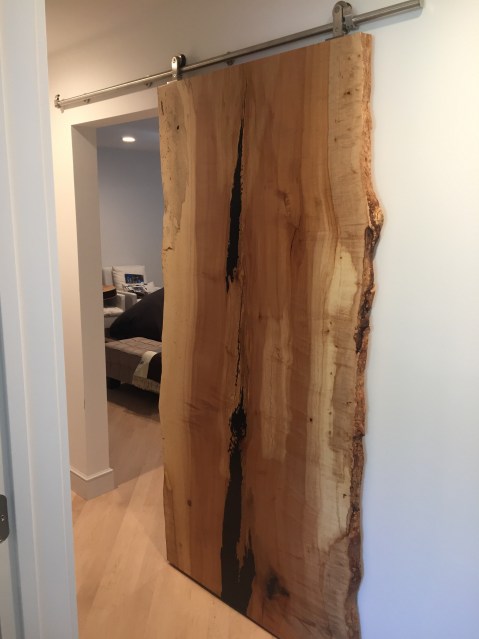
I saw what she saw – bright white, newly and expertly refinished maple floors underneath old, crusty and orange maple cabinets. The cabinets were still in decent shape but they definitely needed some help to not look so old. She picked the right day to ask if there was anything that could be done about the color because I was riding high from a successful install of a very cool door and there was no way I was going to act like I couldn’t do it.
I wasn’t sure exactly how I was going to go about it, but I knew it would start with sanding. And, since everything in the kitchen, including the crown moulding was made from maple-veneered panels with an mdf core, I spent a lot of time very carefully sanding. After I had my parts sanded to an even and much lighter color, I started to apply the Raw Sealer finish from Basic Coatings. I chose this finish for one main reason, and that is because it is the exact same finish the flooring company used. I could have used another water-based finish with a white additive, but I figured why fight it? Use what they used on the floor and I should have the best chance of matching it.
The Raw Sealer has a very small amount of white added to it and I found that I wasn’t getting enough white in the finish until I was up to about six coats on my test pieces, so I decided to add some more white. I added enough white latex paint (about two tablespoons per quart) until the finish was the right amount of white in two or three coats instead of six. The white paint added brightness and covered the yellow orange of the maple, and it will work to retain the original color since the paint won’t yellow. It worked like a white wash for the cabinets and really did the trick.
The most difficult part of the job, besides the tedious sanding, was applying the finish with the white added. It needed to be applied evenly, so I needed to make sure my gun was working great and so was I. There were a few times where the color didn’t look too even or the gun sprayed a little wacky, but I was able to quickly wipe that panel off with a wet rag before the finish dried and reapply.
I spent a lot of hours on this job (more than budgeted, of course), but I think it came out great and I might even be convinced to do it again someday in the distant future. Click on the video link to see what I started with and how it all ended up.
Milling Curly Q Logs
I just milled a short hollow maple log for a customer which ended up having a fun curly Q shape. The log clearly had a wound along the side, running up the length of the log and it was never able to heal over. In the log’s attempt to close the wound, it added extra growth which made the fun shape.
While I was milling the maple log, it brought to mind a sycamore logs which I milled a couple of years ago. They produced some slices with the same curly Q shape, but they were much larger. I clearly remember being quite sad when I cut into the giant logs and discovered they were hollow. Just when I was about to make them firewood, I got a clear view of the curly Q shape and decided to save them.
There really aren’t many practical uses for these cuts, but they attract viewers like crazy in the shop and as far as I can tell have all ended up as pieces of artwork. Check out the video below to see the final product.
Visiting Mueller Brothers Timber
I love visiting Mueller Brothers Timber in Old Monroe. It just feels right to me. I like the the guys that run the place and I like that it feels like I’m out in the country, even though I’m less than thirty minutes away from the shop. I visit there somewhat regularly just to see what is going on, look at logs and to purchase lumber. They run a big operation that I have written about before (click here to read more), but this time I decided to shoot a little video while I was there.
My main reason for visiting was to purchase some hard maple lumber for an upcoming project, since I don’t get hard maple logs, and therefore, hard maple lumber very often. While I was waiting for my lumber to be pulled, I took a look around the log yard to see if anything caught my eye (I don’t purchase logs very often – but I can be persuaded). I’m always amazed by the amount of logs that they have and this time they had even more than normal. I know I love to look around their sawmill and I thought you might too. Check out the video below to go on a quick tour with me.
Some quick notes:
The lumber bundles I am looking at are dry and available for sale, but they only sell by the bundle (usually in the 300+ bf. range). They move a lot of product and don’t sell in smaller retail amounts.
I mention cutting maple logs in the winter, which is desirable because the white (sap) wood of maple logs discolors and stains quickly and easily in warm weather. It is better to cut white woods in cooler weather because they decay or discolor more slowly.
I passed over the double-trunk white oak because I have a lot of white oak slabs and white oak is difficult to dry, especially when cut extra thick. Water doesn’t move readily in or out of white oak which makes the drying very slow and any attempt to speed the drying usually ends with the lumber splitting. Thick white oak can be dried effectively, just not quickly.
Random Width Flooring: Efficient Use of a Valuable Resource
In the normal course of my business, I am sometimes asked to make flooring out of my customers’ logs. Because I mill the logs into random width boards, I would often get stuck with trying to determine the best width to make the flooring, knowing that no single width would have that great of a yield. No matter the width I chose, there would always be plenty of boards with lots of waste. If I chose 3″ wide flooring, I can guarantee you that an astonishing number of the rough cut boards would just happen to measure 8-3/4″ wide, which would yield two 3″ wide boards and one wide scrap piece, absolutely killing me.

This random width hickory floor was rough cut in 3″, 4′ and 5″ widths. I made it from trees harvested on site at Tyson Research Center in Eureka, Missouri.
In the past, I have tried to decide the width ahead of milling the logs and pick out which cut was going to be flooring and which was going to be another product, like siding. It seemed simple enough, if the board I was cutting was long and clear with no knot holes, I would cut siding, and if it was knotty and was going to produce only short pieces that were good, I would cut them for flooring. All I really had to do was sort the lumber into two piles while I was working. But, it wasn’t that easy.
Some logs would have a side that was good for producing siding, but the next side was only good for flooring. When I flipped the log over to a new side, my width was determined by how much I cut off of the last side, and it was always random. So, no matter what I did, even if I was cutting for a specific product, I would get stuck with lots of random width boards.
As I mentioned, wasting lumber kills me, and every time I ripped random-width boards down to some set width, leaving wide scraps on the floor, I thought about how to stop wasting so much wood – then it clicked. Many years ago, a friend of mine showed me a floor he made for his own house out of random width boards. As far as I know, he only did it because he thought it would look different and make his house have a special touch that would only come from someone who made their own flooring. His floor was white oak with tons of character, in three different widths. It was beautiful, and it seemed to me that I could use these random widths in some form to stop wasting wood.
I don’t remember a specific moment when I had the epiphany (though I am sure I must have had one), but I figured out that using just three widths, 3″, 4″, and 5″ would cover every width of board I could produce and always leave me with less than 1″ of waste per board.
Think about it. 3″, 4″, and 5″ wide, rough lumber is covered right off of the bat since they are already useable widths. After that is a 6″ wide board, which will just be ripped into two 3″ wide strips. A 7″ board gets ripped to a 3″ and a 4″ strip, while an 8″ board turns into two 4″ strips or a 5″ and a 3″, whichever is preferred. Any width of rough lumber over 6″ wide can be broken down in some way with just the three target widths of 3″, 4″ and 5″. By the way, these are the rough cut widths. The finished tongue and groove flooring will end up with a face about 1/2″ less in width.

This classroom at Tyson Research Center, features random width maple flooring, I also rough milled it in 3″, 4″ and 5″ widths.
Random width flooring looks different, but not too different. At first glance, the viewer only notices the beautiful wood, and then after closer inspection notices the three widths, which lets them know subconsciously that the flooring is special. It stands out because it isn’t all one width like typical hardwood flooring, and most people have never seen or even thought of using random-width flooring. But, I say, “Don’t be scared of it.” It is different and not typical, but in a good way, especially when it comes to waste.
My First (and Maybe Last) Turning Job
Believe it or not, until recently I had never done any turnings. I have been messing with wood for a solid twenty years and never once have I even turned on a lathe. I’ve seen Norm do it a bazillion times on “The New Yankee Workshop” and listened to plenty of other woodworkers tell me about their turning escapades, but I never felt inclined to do it myself. I guess it’s because I am not attracted to work that has turnings in it, so they rarely end up in pieces that I am building and if they do, I pay someone else to do them.
It wasn’t by my choosing, but I did agree to build a bench with multiple turnings after my customer changed her mind on what she wanted. She showed me a picture from Sawkille.com of their “Tall Rabbit” bench and asked if I could make one like it for her with a variation on the length. Since I already had her deposit on the previous project, I didn’t want to say no and send back the money, so I said yes. I looked at it this way, if I consider myself a real woodworker and I am interested in spreading real-world useable woodworking knowledge, then it can’t hurt for me to have more knowledge myself. After all, was it possible that I would consider myself a real woodworker and die one day never having done a single turning? Sounded pretty hypocritical to me.
First off, let me say that the work from the kids at Sawkille is very nice, and though I don’t know them from Adam, I do appreciate the attention to design details that show in their work. I spent a lot of time messing with small details and proportions, and there is no doubt in my mind that they have spent exponentially more time on those same details and slight variations than I did.

This “Tall Rabbit” bench from Sawkille.com is what started my career as a woodturner.
The picture above is in black, but my customer saw some other variations and decided to go with bleached maple, and though it didn’t seem necessary on maple, bleaching gave the wood a very different look. The maple went from a light yellow-white to bone white with a couple of applications of two-part wood bleach. That part was as simple as could be – the actual turning was not.
Actually, I take that back. The short turnings weren’t too bad. After I turned the first couple and started to get a feel for it, the next 17 went pretty fast and came out nice. I got my time down to about 15 minutes each, which didn’t set any speed records, but it was a pace I could live with. If I did them all at that rate, I could turn all of the pieces in about 6 or 7 hours, which sounded like a fine day of work.
As you might have imagined, I wouldn’t have much to talk about if it all went down like that.
My troubles started when I stepped up to the legs and long stretchers. All of those are in the 24″ range, and about three times as long as the easy-peasy pieces. Out near the ends, where everything is solid, the work went according to plan, but in the middle, I would simply say that it did NOT. No matter how I attacked the middle, whether it be with a light touch or a hard push or maybe a quick jab or a different angle or a different speed or perhaps standing on a different foot or even just squinting a bit more, nothing improved. The piece of maple just jumped and kicked like a bucking bull, and I couldn’t stop it.
Even though I knew my problems were the result of the longer pieces, I imagined that a better turner (or at least someone who had turned at least once before in their life) could overcome the bounciness with better technique. I kept trying different lathe tools and worked slowly to get the pieces as good as possible, and while the overall shape was acceptable, the surface was not. It was nubby, like off-road truck tires, and there were plenty of spots were the wood was just ripped instead of cut. To finish up, I finally dumped the lathe tools and grabbed the sandpaper. I decided to take full advantage of the easy sanding on the lathe and let the paper do the work. Of course, it took awhile, but it was the only way I could come up with to overcome the bouncing spindle syndrome.
After I had a few of the long turnings done, I talked/complained to random shop patrons about my lathe fun and one of them mentioned using a rasp. Apparently, he had more turning knowledge than me (I think everyone does), and he had used the rasp a lot. It made good sense – a rasp is really just super-aggressive sandpaper. Plus, by holding the rasp more parallel to the piece than perpendicular, the rigid flat shape worked great to form the gradual curves with no humps. It wouldn’t have worked so well on intricate turnings, but it worked great in this case.

This is my version of the “Tall Rabbit” bench in bleached maple.
After finishing this project, I have a new respect for wood turners and turning. After all, my turnings were simple and still provided quite the challenge. When I think about some of the turnings I have seen, especially in other works, like large hollow vessels, and I consider all of the issues that the turner might face in a project like that, it really makes me appreciate the craft of it. And, though I may never do another turned project in my life, I am glad I gave this one a go.
River Logging Begins At WunderWoods

“The June rise used to be always luck for me; because as soon as that rise begins, here comes cord-wood floating down, and pieces of log rafts – sometimes a dozen logs together; so all you have to do is catch them and sell them to the wood yards and sawmill.”
–Quote from Adventures of Huckleberry Finn, by Mark Twain
I am reading Adventures of Huckleberry Finn right now (mostly because everyone that considers themselves a fair-bit learned says it’s a proper read) and I came across the above paragraph about wood floating down the river. It struck me for two reasons. First off, I see the river every day and can’t help but be drawn to it for the logs that float past my shop. The second, and most appropriate reason, is that it mentions the “June rise”.
I didn’t know the “June rise” was a thing, even though I knew the river was highest in the spring. Personally, I think of June as the summer, but early June is still spring, and this year the rise was in spring and interestingly enough, in June. As a matter of fact, it was June 1st officially, but started with a vengeance on May 31st.
That night we were at the Ameristar Casino, on the Missouri River, in downtown St. Charles for my dad’s retirement party, planning on an upscale night out with the family. We were going to attend the retirement party, go swimming, watch TV in the bathtub (they have TV’s in the bathrooms), probably go swimming again the next morning and go out to breakfast, and just generally live it up as much as possible with our 7-year-old daughter. I say, “We were going to,” because things didn’t go as planned.
After the party, we went to the pool and were told that we would have to get out because a storm with lightning was headed our way. It wasn’t a big deal because we knew that we could swim the next morning, so we headed up to the room to find something else to do. We ended up watching out from the 22nd floor, with a great view, to see the approaching storm and lightning. It looked rather ominous, so we turned on the news to see that a tornado was headed in our general direction, and so, ended our night of fun.
We sheltered in the basement, hearing second-hand damage reports as we waited for it to pass. We weren’t in the basement long, but the hotel lost power, so we spent the rest of the evening in the lobby until the power came back on. When we finally got up to our room, we, of course, looked out the window and could see vast areas of darkness where there should be light, punctuated by areas of bright flashing lights. The tornado had come very close to the hotel and the lights were from emergency response teams. It looked like the tornado might have went close to our house as well, but there was nothing to do that night. All of the power was out and traffic was all locked up because the highway was closed, so we just hung out in our room, watched the news, watched the rain, and went to bed.
When the sun came up, there was some evident damage from high winds, but the most obvious outcome from the storm was the rising river. It was already a little high before this latest storm, and the all-night rain pushed it to flood levels. The water from the river was starting to fill the lower parking lot, making the hotel an island.
As I looked out from the 22nd floor, I could easily see a large segment of the Missouri River, and guess what I saw. Logs, logs and more logs. Huge ones floating right on by, and in good numbers. In just one minute, easily three to four giant trees would go by, along with all the smaller pieces. The “June rise” was on.
As much as I wanted to get all of those logs, it was obviously too dangerous. The water was high and swift, and as far as I could tell, only an idiot would get on the river in those conditions. It didn’t matter right then anyway, because I had to focus on the ramifications of the tornado.
A few days later, as I was looking at some downed trees from the tornado, one of the guys in the conversation mentioned how fast the river can drop in just a day, “like someone pulled the drain plug,” he said. Near the river, he had a house that was flooded the day before and was now on dry land. He also mentioned that he had a lot of trees just float onto his land, as well as some that were knocked over by the tornado.
This got me thinking more about the logs on the river, and that it would be a good time to look for logs or driftwood. But, I didn’t do much about it. I had a never-ending supply of logs right around my shop from the tornado and didn’t need to go looking for trees in the river. Plus, the river was still high, even though it had dropped a lot.
As much as I tried to avoid them, I couldn’t. Within just a couple of days, I was headed across the Missouri River on the Blanchette Bridge back into St. Charles, when I noticed the mother lode. Off to the right, near a parking lot for downtown St. Charles and Frontier Park was the biggest log jam I have ever seen. It was as big as a football field full of logs and driftwood, all piled in tight and screaming my name. It was huge, and I expected that I could pick logs from this pile for a long time. All I had to do was wait for the ground to dry a bit, and I could move in (with the proper clearance, of course). I knew that the logs would be there awhile because every person working for St. Charles was cleaning up the tornado debris and none of them were going to worry about this pile of logs, no matter how big it was, on the banks of the river. Heck, another good rain would take it down river anyway. So, I waited – but not long.
Only two days later, I was headed across the bridge in the same direction and looked down at the giant log jam to see only dirt. A football field-sized piece of real estate that used to be covered in logs, was now just dirt. It was incredible that they could have cleaned up that many logs that fast, but somehow they did. I thought I had plenty of time, but I still missed them, just like the great walnut log I let go downstream at the end of winter.
I told myself it was for the best, and that I didn’t need to chase river logs, but I was sure that the “June rise” had left something for me. It is a big river, and I knew that there were treasures to be found. I held out as long as I could, but then finally, I took the official “plunge”.
It happened a couple of weeks ago and knowing that summer was coming to an end, I went out and picked up five river logs, figuring that I better do it now before the water gets cold. I didn’t find any walnuts this time, but I did find one, in particular, that makes me want to go back. It is a silver maple, like the others that I picked up, but it must have spent more time in the water because the sapwood was very dark, almost black. At the same time, the heartwood looked almost new, making the boards with both sapwood and heartwood have amazing contrast. I was especially excited at how the dark sapwood looks like marble or some other stone. I always say, the less it looks like wood, the better it is.
Here are some photos of my prized log. Click on any of the photos for a closer look and to view the slide show.
-

- The first cut on this log revealed dark-stained sapwood mixed with bug holes.
-

- This photo shows the beautiful mix of stained sapwood, bug holes and a little tan-colored heartwood.
-

- The second cut shows how well preserved the log is from the water. The log is solid and the heartwood looks almost new.
-

- On the left is one of the first cuts on the outside of the log. On the right is a second cut, which better shows the contrast between the heartwood and sapwood.
The entire log was solid, including the sapwood and produced six slabs up to 22″ wide and 2-3/8″ thick, and in case you were wondering, all of them smell like the bottom of a river. Other than that, milling this log was a completely enjoyable experience. And, even though I can find plenty of logs on land, this one log will have me going back to the river again, especially around June.
Soft Maple Is Not Too Soft
Silver maple has a special place in my heart. It was one of the first trees I ever milled (I would say it was my first, but my memory isn’t that good). It was a tree taken out by our neighbor and had a short trunk, only about 6′ long, and about 24″ in diameter. At the time I knew little about processing lumber and nothing specific about maples, and didn’t know what I had. Looking back it was a great short log. It had very little heartwood, which meant that all of the boards were a bright white color. Plus, it had no knots except for the very center.

Silver maple comes in many different figures, including ambrosia (on the left), caused by small beetle holes in the middle of each tiger stripe.
Like I said, the lumber was nice, but I didn’t know how to feel about it. Around here, maple isn’t that prominent. We have a lot of silver maple in yards and along the big rivers, but this is basically walnut, cherry and oak land. The fact that it was maple threw me off, and the fact that it was silver maple really threw me off. I read what I could about it in books (since the internet wasn’t widely available). I also checked out field guides, focused on magazine articles and tried my best to figure out where I could use the lumber.
Everything I read made silver maple sound like a loser. It was a secondary wood. The Audobon field guide probably said it was used for wood spoons (everything that has no odor is used for wood spoons). Sugar maple was what I wanted. It was hard maple – tough and durable, the kind of stuff they make the first few feet of a bowling alley out if, not to mention the pins. I didn’t have sugar maple, I had silver maple, which is a soft maple. But it looked nice (did I mention that?). Some of the more quartersawn boards even had a little curly figure. Nobody had anything good to say about soft maple. So, I didn’t use the wood right away. I dried it and slowly used it here and there as a secondary wood, but that was all.
When I used it, I found that it planed easily and would come out clean if the grain was straight. I also found it to work well with other tools and started to wonder more about why it gets such a bad rap. I finally figured it out – it’s the name.
They call silver maple “soft” maple, while sugar maple is called “hard” maple. I would argue that this is wrong. Silver maple should just be called “maple” and sugar maple should be called “unnecessarily hard maple”. That would even out the playing field. No one would want to use wood that was unnecessarily hard. They would want a wood that is just right, like silver maple. It does everything hard maple does, comes in almost all of the same variations and won’t make you dread running it through your tools.
I even used silver maple (ambrosia figure) for the floors in the kitchen of my last house. It looked great and worked fine as a floor. Sure, it dented some, but hard maple dents too. Think about it, even oak dents, so the question is, how soft is too soft?
Silver maple is soft compared to sugar (hard) maple, but that isn’t saying much. Compared to sugar (hard) maple, cherry and walnut are softwoods too. But, cherry and walnut are great woods and the fact that they are not rock hard makes them even better. They are not too heavy and they are a pleasure to run through the tools. So how does silver maple compare to woods besides hard maple?
To put it in perspective here are a few domestic species and their densities or specific gravity. The higher the number, the denser and heavier the wood. Though silver maple is not the hardest of the group, notice the fine company it keeps in the middle of the pack.

This entire secretary is made from silver maple. The door panels were a blistery, curly figure that happened in a big old log.
.35 – White Pine
.37 – Basswood
.42 – Poplar
.47 – Silver Maple
.50 – Cherry
.55 – Walnut
.63 – Sugar Maple
.63 – Red Oak
So, I eased into using silver maple. First, I just used it for stuff around the shop, like fixtures and jigs. Then, I started using it for drawer sides, then painted parts and then stained parts.
Now, I use it regularly and will gladly let it be the primary wood. It works especially well for my more rustic work because I can find specific logs with lots of character. They are often curly or wormy or figured in some way. And, at the same time you can find logs with clear, bright white lumber.

This sofa table was made from ambrosia maple.
I have been amazed at how diverse silver maple is, and I am always finding new places to use it. I would encourage you to give silver maple a try as well, and don’t forget to call me when it comes time to stain (staining maple is worthy of an entire blog posting on its own).
WunderWoods River Logging – Just The Beginning, Or The End?
This past Saturday I took Mira, my 5 year-old daughter, to downtown St. Charles, MO for a girl scout outing at the Lewis and Clark Heritage Days Festival. I was sent because Chris, my lovely wife, was busy working on Mira’s birthday party scheduled for the following day and because she didn’t really think it was going to go that well. It was going to be hot (90ish) and we were going to do boring things, like milk cows, make candles, pet ducklings, learn how to make arrowheads, learn how to start a fire with flint and steel, drink authentic root beer, watch a juggler, watch a guy carve wooden signs and make wooden rings, learn how to make thread from wool, watch the drum and fife corp (much cooler than I thought it would be), make butter, pet a calf, shop for a tiki turtle necklace and pet horses. Needless to say, we were there for quite a while and would have stayed longer, but after almost four hours we were running out of energy and time. We had to get home – fresh cupcakes were waiting for us.
The last thing we did was see a juggler and headed in the direction of the car. We were close to the river (Missouri) and the water was low, so I said, “Let’s walk down to the river before we go and check it out.” Mira was starting to fade and didn’t really want to, but she said O.K. with the promise that we would head home after that. The river is big and muddy and isn’t very scenic, but for me it always holds the possibility of big catfish and big logs, so we headed down. There were lots of people in the park, but we only passed two guys walking along the river (it isn’t very scenic).
We weren’t down there very long and I found a big, burly maple log. Mira wanted to go. I looked to the right and saw another good-sized log. We checked it out and it was a walnut. Mira wanted to go. I was excited because I expect every log along the river to be a cottonwood, and so far I had found no cottonwoods. I started coming up with plans on how to get the logs out; boat here, truck there, wait a little for the water to come up. Mira wanted to go. I didn’t see any more logs to check out, so we headed up the bank.
We walked until we found an opening in the weeds that I thought was in line with the car. At the top of the bank I took a look around to see exactly where we were. Directly ahead I saw a fair number of gentlemen dressed in bright red British regalia. Behind them was a large crowd of people gathered around to see something. It was me and Mira, about to have our heads blown off by the British and their big fancy canon – and to think we didn’t even dress up. One of the soldiers saw us pop up like whack-a-moles and started flailing his arms and yelling, “Get Out Of There! MOVE!”
Luckily, they hadn’t lit the cannon yet and, more luckily, I am pretty sure they didn’t have a cannon ball in it. They kept yelling, we kept moving and people kept staring at the idiots that walked in front of the cannon, until finally we were out of the way enough to fire. By the way, that thing was loud.
Here are the logs we almost gave our lives for.
-

- Top of the walnut with some crazy growth.

-

- Walnut log with crazy top

-

- Big burl section on the maple.

-

- Burly maple log

New 100-year-old cherry; It is (no) lye!
Some woods stain great – some don’t. Oak, walnut and elm come to mind as the great ones. They stain easily and consistently, with no blotches or uneven color. On the other end of the scale are woods like maple and cherry, which are also consistent – consistently frustrating. Hard maple is the worst of the worst, with some of it taking almost no stain (I compare it to trying to stain a piece of glass) and other areas, like end grain, sucking up all the stain in the can. Anywhere that the grain simply changes directions is a spot for blotches to show up.
Right up there with maple is cherry. Although you can get some cherry boards to stain perfectly, many will look like a first-grader did it (and not the one first-grader that pays attention in class). The other problem with cherry is that it is usually expected to be at least medium-dark, which means the wood has to be darkened up somehow. I have a few recommendations for hard-to-stain woods, but for cherry, I have a trick. If you know it, don’t say anything yet.

This secretary was made from curly cherry and darkened with lye.
I don’t remember where I first heard of it, but I was told that lye darkens cherry. That’s right, lye, like the soap or Drano. I didn’t know anything about lye, so I did a little research. And, after using it many times, I can tell you that a little research is all I needed. It is amazingly simple and produces awesome results.
If I want a nice medium to dark cherry and don’t need to match a specific color, I will use lye before anything else. Lye is great because it does in seconds what would happen naturally in a very long time. It chemically changes the color of the wood, allowing all of the figure to show through without blotches. The new color created by the lye also goes below the surface to provide a measure of safety when sanding between coats of finish.
I use Red Devil lye (drain opener), which has apparently been discontinued. Lowe’s carries a crystal drain opener that is 100% sodium hydroxide (the active ingredient) or lye. I, however, have never used this product, so I cannot attest to its effectiveness.
To use the lye, simply mix with water. I use about two tablespoons to 16 oz. of water as a starting point. Test on a sample cherry board to see how dark it comes out – the change will be almost immediate. Add more lye to darken the color or more water to lighten it. To apply, use a nylon brush (natural hair brushes will melt away) to saturate the surface of the wood, keeping a wet edge and let it dry. That’s it.
Handle the lye mixture with caution and follow the safety instructions on the label. Specifically, wear rubber gloves and safety glasses, and make sure you have adequate ventilation.
Treat the wood as if you were using a water-based stain, by raising the grain before applying the lye. After the lye is dry, the wood can be finished and requires no treatment to neutralize the lye. I like to apply an oil finish before the topcoats to make the surface shimmer and really show off the magic of the lye.
No matter how you finish the piece, I think you’ll be amazed at how easily and quickly you can have a piece made from new 100-year-old cherry!
White Wood, Sap Wood and Spalted Wood


This hickory was cut quickly, before it could spalt. Hickory often has sapwood that is thick enough to produce all white lumber.
Lumber that we consider white woods will have a much thicker ring of sapwood when compared to lumber that you would normally think of as being darker. Here is the trick, the sapwood needs to be thick enough to produce a reasonable amount white lumber. This is very often the case in species such as maple, ash, and hickory. In these trees, the sapwood is thick enough that we can use use it. In darker woods like walnut, cherry and oak the sapwood is usually only about and inch thick and is trimmed off like fat from a choice piece of meat. Within, the white woods it is possible to have a log that is almost entirely sapwood or a log that is almost all heartwood. It is most common that the white wood log is about half and half.

This is a good example of spalted silver (soft) maple. It shows the darker heartwood with minimal color change and the lighter sapwood with the dramatic spalting characteristics that woodworkers look for in light woods.

This dresser was built with WunderWoods lumber by customer Steve Palmer. It is a great example of consistently spalted lumber. This log had a lot of sapwood, which made some nice wide spalted boards.
What’s Going on at WunderWoods

Everyone always asks what I do. Here's the answer. Click on the photo above for a short video tour and see all of the steps it takes to go from a tree to finished furniture.