How to Fold Up a Bandsaw Blade
Whenever I put a new blade on my sawmill, I fold up the old one to send it out for sharpening. I don’t find the process as awesome as I used to, but it still seems to intrigue others that haven’t seen me do it before. And, I must admit, when I know someone is watching that hasn’t seen me fold up a bandsaw blade before, I do it extra fast and super snappy to make it seem even more dazzling. With a quick flick of my wrists, the 50″ diameter loop of bandsaw blade is reduced to three loops at just 17″, making it easier to handle and ship out.
I learned how to coil a bandsaw blade like this pre-YouTube and over the phone from the kids at Wood-Mizer, who supply and sharpen my blades. It took a few tries to do it the first time and many more to get good at it, but I figured if I could learn it over the phone then I could certainly show others how to do it with visuals. The good news is that like learning to ride a bike, once you get it, you’ve got it.

It all starts with a pair of gloves and holding the blade with the teeth facing up.
To prepare, put on some gloves (without holes). Start by holding the blade with each of your hands on the outside of the blade, away from your body and parallel to the ground with the teeth facing up. Imagine that you are holding out a large basketball hoop in front of you waiting for someone else to take a shot. From there, whip the portion of the blade furthest from you towards the ground and just as the blade nears the ground give it a quick jerk up, with a snap. This motion will make the blade start to fold in half, with the teeth going away from you. At the same time that the blade starts to fold in half, simply twist both of your wrists towards the inside of the loop. If your timing is right, you will get to a certain point where the blade no longer wants to fight you and then it will just spring into three loops.

When first learning to coil a bandsaw blade, you can cheat by using the ground to help you get started.
When you are first learning this technique you may find it helpful to get a feel for it by cheating a bit. Start just as described above while standing on carpeting or grass or some other surface that is soft and will grab the teeth of the saw blade (I show it in the photos using a piece of lumber). Now, instead of whipping the blade towards the ground, just drop the end furthest away from you to the ground, so that the blade is now perpendicular to the ground. Use the soft and grabby surface to snag the teeth as you start to lift and push the blade up an away from you. Instead of getting the blade to fold in half with a whip motion, you are now going to get it to fold by pushing against the soft floor. As the blade starts to fold in half, with the teeth away from you, roll your wrists to the inside of the loop, just like described above. Using this method, you will be able to feel the exact point where the blade stops fighting you and happily coils into three loops. You should be able to get a feel for it after just a few times with this “cheating” method and then move on to the fancy, snappy method.

As the front of the blade starts to fold down and towards you, twist your wrists and push towards the inside of the the loop.

When your hands move to the inside of the loop, the back of the blade (closest to you) will curve down.

After a certain point the blade will jump into three loops and stay there. Now you’ve got it!
Setting Up Shop: The Most Useful Power Tools
When customers visit my shop we usually start by talking about their wood needs. If it is someone’s first time to visit I also try to get to know them, what they are looking for and what they are expecting from me. Half of them are just looking for rough cut wood, while the others are looking for wood that is processed a little bit more, perhaps jointed or planed, or even sanded. During our time together I get to understand their needs and abilities, and our discussion usually turns to the tools they have in their shop.
I am often surprised at what tools woodworkers don’t use or own, especially when they are some of the few that I find essential. Sometimes it’s just the difference between hand tool and power tool guys, but sometimes it’s just from lack of experience or the fact that they haven’t given it too much thought. Most likely they just buy tools as they need them and never really considered what tools would give them the most bang for the buck.
Since this is a common conversation, I decided to compile the following list of what I think are the most useful power tools and should be the building blocks of any woodworking shop:

Notice how my table saws can work both as a table and a saw.
Table saw. Of all of the tools in the shop, the table saw is the most useful and versatile. It excels at making straight cuts, and with the addition of any of a million jigs, can be made to perform an amazing number of tasks with repeatability and precision. I use the table saw for roughing out smaller parts from larger pieces, all the way through trimming parts to final size. The only limit to the table saw is that the piece needs to be small enough to be pushed through it. Above a certain size, the table saw becomes less useful and even impossible to use as the saw needs to be brought to the piece, instead of the piece being brought to the saw.
The table saw is best suited for making rip cuts, which are cuts along the length of the board, but with a crosscutting jig, the table saw can do just as well on crosscuts, which are cuts across the board. I even use the table saw for resawing thick lumber into thinner boards. The bandsaw is usually the tool for resawing, but any lumber under 6″ wide can be resawn on a 10″ table saw by cutting from both sides of the board.
Besides just making through cuts, the table saw can also cut dados, rabbets and other grooves with just a few adjustments. And, with the addition of profiled cutters and a creative mind, the table saw can be used to make all kinds of mouldings, including large crown mouldings.
The table saw also works amazingly well as a table. Mine is big enough to not only hold stuff, but serve as an assembly table when necessary. The table of the table saw is set apart from other tables because it is commonly the only one open and available in the shop. I try to keep it clear enough to actually use, which means that at least part of the top is usually available and ready to be used as a table or maybe even a saw.

My Powermatic planer has prettied up a lot of wood.
Thickness Planer. Running a rough board through the planer is always fun. Even after sending billions of board feet through a planer, it never gets old. The amazing thing is that beyond making the wood look good, the planer can size lumber in ways other tools can’t.
I have met a lot of customers that don’t have a planer. And, while it is possible to operate without one, I believe that once you own one, you will find it hard to believe that you ever ran a shop without it. For me, it is along the same line of thinking for spray guns, where I say, “Stop thinking about buying a spray gun.”
Even if you buy your lumber already planed, you will still encounter many circumstances that require the use of a planer. For example, you might want to build a simple and delicate jewelry box out of small scrap pieces lying around the shop, and you will end up making a small and clunky jewelry box because all of your lumber is 3/4″ thick, and that’s how it is going to stay. That is just the first example. Think about all of the other times that you will pick up a piece of lumber in the shop and it will be the wrong thickness, either just slightly wrong or in an entirely different size category. A planer is a real problem solver and can fix all of that.
If you work with rough lumber, a planer will be absolutely necessary, except for the most rustic of projects. Every piece of rough cut lumber ends up somewhat not straight, not flat and not consistent in thickness, either from variations during the sawing or from stresses which occur while the wood dries. The planer, combined with the jointer, is a one-two punch to remove these variations and produce straight, flat and consistently thick lumber. The reason the planer is ahead of the jointer on this list is that some lumber is straight enough and flat enough to plane without jointing if the job is a little less finicky, thereby skipping the jointer.

Flattening the face of a board before going through the planer makes assembly so much easier.
Jointer. I use my jointer a lot. When preparing rough lumber it sees as much action as the planer. As a matter of fact, almost every piece of lumber in my shop gets surfaced on the wide face to straighten things out before it even heads to the planer. Without the jointer, my life would just be a crooked, twisty mess of painful attempts to make things seem straight.
One of the misconceptions about planers is that they make lumber straight. They do some straightening, but they don’t make lumber straight. That is what jointers do. Many lumber mills just send rough lumber through the planer allowing the board to exit the machine with the same ups and downs and whoops that is entered with, only now to a consistent thickness. This is especially apparent when gluing up a couple of these roller coaster type of boards and trying to get them to line up. After a couple of those glue-ups, you will swear by lumber that has seen the jointer before the planer, and never skip the jointer.
Besides flattening lumber, the jointer also puts a straight edge on lumber for joining two boards together and for running through other machines. I also use the jointer for making small adjustments during the final fitting of parts like drawer fronts, where small changes can make a big difference.
With these three power tools (and a few hand tools), I feel like I could make about 80% of the jobs that come through my shop on a daily basis. Obviously, some jobs will require more specialized power tools to complete, but these three probably find their way into almost all of my work. With that said, there are a few other tools that I couldn’t imagine being without and I feel need to be added to the list.
Spray gun. Not every woodworking job gets a film finish, but most of mine do. And of those, every one will meet a spray gun. For a million reasons, including making finishing fast and fun, I recommend using a spray gun whenever possible. It will raise your game and make you n0t hate finishing. (Click here to read my thoughts on purchasing a spray gun).

The chop saw (compound miter saw ) gets a lot of use, especially trimming long pieces of wood.
Chop saw (compound miter saw). I do a mix of woodworking from furniture to built-ins and even finish carpentry, and I find myself regularly using the chop saw. Even if used for nothing more than roughly cutting a long board into two shorter ones to fit in a car, this tool earns its keep. It is especially useful (with the help of an outfeed table) on long pieces that are precarious to push through a table saw. But, since a table saw with a jig can perform many of the same functions, this tool doesn’t make it to the essential list. With that said, I expect to have a chop saw wherever I am working, whether it be in the shop or at an install. If this was a post about on-site woodworking and trim carpentry, the chop saw might be the #1 tool.

I have three impact drivers and could use more.
Impact driver. I am a giant fan of impact drivers. I have been using them for a while now and can’t really remember my life before them (Click here to read more about my introduction to impact drivers). This is the one tool that I always have with me, and I expect to be within easy reach. So much so, that I own three of them and could imagine myself with a couple more. Like the chop saw, if this was a list of on-site or installation tools, the impact driver would be near the top.

The FatMax is my favorite tape measure.
Tape measure. I know this isn’t a power tool, but it is the one tool that you should always have with you. It is a pet peeve of mine – if you are planning on building something, or you are actually building it, have a tape measure with you. If you are in the shop, on the job site, or even at Home Depot make sure you have a tape measure with you or at least one very handy (Home Depot probably isn’t the best example, since they have them widely available, but you get the point). Without a tape measure, not much beyond rough work can get done. (Click here to read about my favorite tape measure).
General Tools MMD8P Moisture Meter Is Good On The Outside

The General MMD8P features a bright OLED display, built-in species correction, displays ambient temperature and humidity, and stores multiple readings.
When the General Tools & Instruments MMD8P moisture meter ($199) showed up to be reviewed, I was excited. I have moisture issues with wood – it seems like it’s always too wet to use and I don’t want to wait. Waiting takes all the fun out of opening up a log, and the longer I have to wait for wood to dry, the less of it I can sell. That is where the ol’ moisture meter comes into play. Much better than just guessing how wet the wood is, a moisture meter should tell me exactly how wet the wood is. It sounds simple enough, just put the meter on the wood or at most push two pins into the wood and take a reading, but it isn’t always that simple.
There are a range of moisture meters out there and they don’t all work the same and they don’t all read the same. I was hoping that the MMD8P from General that just showed up would be the meter of my dreams and for once make me feel confident that I knew just how wet my wood was. And it appeared that is just might.
Though I wasn’t impressed with the light, toy-like feel of the unit, it has more buttons and obviously, more features than I am used to in a moisture meter. It shows the relative humidity and temperature of the environment, which is pretty cool and has a menu for selecting different wood species, which is also cool. My first moisture meter (that I still own) has paper charts for species and temperature adjustment. I don’t bother with the charts, but I will gladly allow the meter to make the adjustments for me, and the General MMD8P does just that.
The first thing I did was play with the species correction. The interface, while obviously not from the great designers at Apple, worked fine and I was able to get to the species I wanted after a quick perusal of the owner’s manual. There are more than enough species to choose from and they are accessible by just pushing the up or down arrows until the desired species appears. It took only a few seconds to quickly flip through the alphabetical list, pick a species, and start jamming the pins into some boards.
A notable difference between this meter and other pin meters that I have used is the thickness of the pins. These are stout, less like pins and more like cones. My first thought was, “Now, these pins won’t break. Finally, pins that won’t break.” They are built like a tank compared to the pins on my Delmhorst (which often break), but after using them, I am not sure that it’s an advantage. I felt like the pins didn’t penetrate very deeply, which made my readings feel even more like surface readings instead of core readings. It also seemed like the pins wanted to eject themselves from the wood, and any difference in pressure while taking a reading resulted in a variance on the readout. If I pushed hard, the reading might be 9% and when I let up a little, the reading could be 12%. Unfortunately, there is no way to know which of those numbers is accurate. In my head I want it to be the drier number, but my heart knows it’s the wetter number, or even worse.
The display on this unit, which is touted as a major selling feature is big and bright and can be configured to display critical information in a few different ways, though I imagine that most users will pick one option and just stick with it (most likely the one that shows all of the information and not a truncated selection). I chose a display option which shows the moisture content reading very large, which seems to just make sense. After all, that’s what it’s for.
I moved around my shop from board to board checking to see how it worked and finding the moisture content of random boards – most of which were around 10%. That is fine if it is accurate, but at the same time very disheartening, and here is why, in the form of a little more background.
As I mentioned, I have a moisture meter, a Delmhorst J-lite, which was the first meter that I purchased. It is a pin-type meter, just like the General MMD8P and it always reads 9-10% or drier. Maybe not always, but it feels like always. I think it is a lazy meter and doesn’t try very hard. It says in a very monotone and cubical job sort of way, “10% boss. Next reading, 10%. The wood that you cut just a few weeks ago, 10%.” If it doesn’t read 10%, it will only read lower (even painfully low), unless I just cut the wood, where it may possibly read higher. I was so sure that the meter wasn’t working properly that I called Delmhorst. Officially, it checked out OK, but I still don’t trust it.
Since then, when I really check for moisture I like to use a Wagner MMC220 pinless meter, which takes readings 3/4″ deep using electromagnetic waves. The numbers go up and down like I expect in different woods and even in different spots on the same board. It will read 10% too, but it can do 9% and 6% and even 13%. Heck, sometimes it even does 17% (crazy, I know). I am still not sure of its absolute accuracy, but at least there appears to be movement in the numbers, and in a logical fashion – wood that is newly cut is wetter than wood that has been on sticks for a while. It will even read accurately on rough cut wood and won’t leave holes when you are checking surfaced lumber or finished projects.
So, back to my review.
I used the General MMD8P meter, and seemed to get the usual 10%ish measurement. I was testing wood that had been dried and had been in the shop awhile, so 10% or somewhere from 9-11% made sense. Then I tried an 8/4 chunk of walnut that I had cut only two weeks earlier. Funny enough, I didn’t get 10% like I expected, but I apparently pushed the meter a bit and got it to go to 13%, which at least told me it was wetter than normal (for reference, it should have read off of the scale, or at lease 30%). I thought, “Here we go again – another ten percenter!”
Now it was officially time to get to the bottom of this, once and for all. This new meter has the right look, it has all the extra buttons, it has a fancy display, but why must it always read 10%. I knew the walnut that I tested was soaking wet on the inside. Sure, the surface was perhaps 10%, but if I was strong enough, I guarantee I could ring water out of the middle of that board. I grabbed the $8 per board foot wood and threw it on my chop saw to expose some of the wood in the middle and took some new readings.
The very center was very wet and read as very wet, above 40%. As I moved towards the outside of the board it got drier, and in logical increments, until the outside reading of, you guessed it, 10%. That was good news. At least this meter had the potential to read something other than 10%, and it seemed to be accurate.
I took it with me to check on the kiln progress and went through the same process with 8/4 walnut in the kiln that was nearly dry. The shells were reading dry, around 6-8%, so I trimmed an end to test the inside. The General MMD8P meter did a good job of showing me the moisture content in the middle of the board and the moisture gradient as I moved towards the outside, just like it did in the shop. The numbers read as I would expect for how long the wood was in the kiln with a high number of 13%, and did a good job of telling me that the inside was still a little wet. So far, so good, for a pin-type meter.
I continued using the General MMD8P meter for the next few weeks. If I found myself wondering about the moisture content of a piece of wood, I checked it with the meter. It turns out that it isn’t just a ten percenter. In the shop, I got a full range of readings, and in a logical fashion. Shells were drier and when I cut into boards, the centers were wetter. The drier shells even showed a wide range of readings, again, all that seemed accurate.
The only problem is that I had to cut into the board to get an accurate reading. I know (and everyone else reading this knows) that the outside is drier and probably around 10%, but I don’t need a meter for that. I need to know the moisture content inside the wood and therefore, the overall moisture content of the wood. I need to know if the wood is still shrinking and how much shrinking it has left inside it. This is especially true in a species like white oak, for example, that doesn’t give up water and can be completely wet in the middle for a long time, even when the shell reads as dry.
The question that was continually in my head as I was reviewing this meter was, “Why would I use a pin-type meter that punches holes in the wood and only gives me a reading near the surface?” Unfortunately, the answer is I wouldn’t. No matter how bright the display, no matter how big the numbers, no matter how many corrections are built-in, no matter how many readings it can store, I wouldn’t choose a pin-type meter and I wouldn’t recommend one, not even at half of the price of a pinless meter. I think the General MMD8P meter is good for a pin-type meter with all of the controls that I could ask for and more, but it just doesn’t do the job that a pinless meter, with quick, accurate and deeper readings, can do.
10 Best Christmas Gift Ideas For Woodworkers
If you are not sure what to buy for your favorite woodworker or just your idiot husband, I am here to help. I have put together a list of gifts that I would be glad to receive and assume that other woodworkers and idiots alike would enjoy. I have included name brands where I think they are necessary to keep a good gift from becoming a flop. They are in no particular order and if you do the math there are probably more than ten.
 • Clamps. Woodworkers will tell you that they can never have too many clamps. While this is true, they can have too many bad clamps. Even if you just buy one pair of clamps, make them good ones. QuickGrips are excellent one-handed clamps and are great to have around the shop. I recommend the 12″ length. For flat panel glue-ups parallel clamps are the best. I prefer Bessey because they were the original, but others work well, like Jorgenson. F-style clamps are also handy. Again, Bessey is a top name along with Jorgenson. I would stay away from pipe clamps. I don’t like the way they work and they don’t seem very fancy for a christmas gift.
 • Impact Driver. Not long ago impact drivers weren’t so widely used. I remember thinking that they didn’t seem like an improvement over a regular drill for driving screws. I was wrong, wrong, wrong. If you know someone who uses power tools and doesn’t already have one, the impact driver is a no-brainer. They are on the higher end of the price scale, but worth it. I haven’t met an impact driver that was bad. The difference in price is usually the quality of the battery. Cheaper tools have batteries that don’t last very long. I use Dewalt, but other guys I work with use Makita, Hitachi, Milwaukee, and Ridgid with no complaints.
 • Hand Planes. Good hand tools are always appreciated. Start with a block plane. If they already have a block plane step up in size to a bench plane. If they already have a bench plane step up to a bigger bench plane until you run out of money or options. Lie Nielsen is a name that woodworkers aspire to have. If you have a never-ending supply of money and can wait until next Christmas, look at a Sauer & Steiner.
 • Bosch Jigsaw. A good jigsaw is a blessing after using lesser quality tools. I am a fan of Bosch, again the first and still the best. A jigsaw is used more for installations and on-site work, but is also useful in the shop on a regular basis.
 • Oscillating saw. Along the same lines as the jigsaw, it is used for a lot of on-site work, but otherwise it is its own class of tool. It is not used on every job, so it wouldn’t be my first pick for a gift, but it is a great choice for the woodworker that loves power tools and has every other tool. There are lots of attachments available that make this a very versatile tool.
 • Porter Cable Router. Routers are used on almost every job in my shop. They can be used for making parts, doing joinery, or fancying up an edge. The most common size is 1-3/4 horsepower and is a good all around pick. Porter Cable has an array of choices in routers and accessories and is the go-to brand for most shops.
 • Premium Saw blade. There is nothing like a new sharp saw blade to make woodworking more enjoyable. For a christmas gift, go the extra mile and buy a premium blade. Forrest Woodworker II saw blades have a great reputation and produce great results. For the 10″ table saw, a 40 tooth combination ATB (alternating top bevel) is a great choice.
 • FatMax Tape Measure. I always used cheap tape measures or whatever was within easy reach until I used a Stanley FatMax. Now, I will walk past any other tape measure and to the other end of the shop or even out to my truck to get to the FatMax. That is saying something since my shop is 200 ft. long. They are accurate, durable and have a long reach. Christmas is a great time to splurge and by the expensive tape measure. The first FatMax I bought was $25 and worth it. They are less expensive now.
 • Combination square. This is one of the key layout tools in my shop. For a gift, splurge and get a good one. An accurate combination square will be used on every project. Look for a cast iron tool as compared to aluminum. Starrett is the most coveted.
 • Nippers. Nippers are great for lots of applications. They work like a pair of pliers to help remove nails. Whether it’s pulling an errant brad in new woodwork or nails out of an old piece of trim, nippers get a lot of use. Nippers are more for on-site installation type of work, but I use them in the shop too. Mine are Channellock brand.
 • Premium Paint Brush. Like clamps you can never have enough paint brushes, but you sure can have too many bad ones. Go crazy this holiday season and give a $15 paint brush. I recommend a 2-1/2″ angled sash brush. There is nothing like a brand-new premium paint brush.
 • Drill Doctor Drill Bit Sharpener. Every woodworker and do-it-yourselfer has a box with drill bits in it that are dull. They are still good, but dull. Even guys that love to sharpen their tools have dull drill bits. Fix this wrong in the world and save the drill bits. The Drill Doctor is fast and works great, plus a lot of woodworkers don’t have one.
 • Small/Quiet Air Compressor. Many woodworking tools use compressed air. And like routers, it is fine (in some states required) to have more than one air compressor. For a gift, try the Senco PC 1010. I own one and love it. It is tiny, but will run a brad nailer and many other nail guns. It is super portable and ultra quiet. Do not, I repeat do not, purchase a Porter Cable pancake model. It is cheap and works fine, but it is the loudest tool in the entire world. I know guys that own one and they have extra long hoses so they can get the compressor as far away as possible, usually outside.
 • Japanese Saw. Great for flush trim work and small pieces. They are super sharp and cut fast. American companies make similar saws, but for a gift make sure it is japanese.
Stocking Stuffers.
 • Glue. Any name brand wood glue is good. I normally use Titebond with the red lid for interior work.
 • Note Pad & Pencils. I am a bit of a pencil snob. The best pencil for woodworking is a Dixon Laddie. It is a fatter pencil that won’t easily break, and it can be sharpened to a fine point or can make a bold line when needed.
 • Tape. I never have enough tape in the shop. A stocking full of 1″ blue masking tape would be a welcomed sight.
 • Utility knife. Everyone can use a utility knife. Put cheap ones in the stocking or buy a good one and give it as a stand-alone gift. Folding versions can be carried at all times and fit easily in your pocket.
2013 St. Louis Woodworking Show In Collinsville IL
This is your reminder to go to the St. Louis Woodworking Show and, while you are there, stop by the booth for the St. Louis Woodworkers Guild. It is a collection of approximately 100 woodworkers, most of them hobbyists, that get together to talk about wood, and we are always looking for new members. Say hi and see what it is all about.
The St. Louis show (which is actually across the river in Collinsville, IL) is usually around Valentine’s Day and this year will be February 8th through February 10th. The admission is $12, but it’s still worth the money. You will see lots of exhibitors giving short seminars as you stroll the aisles, and you can also sign-up for longer, more in-depth seminars on specific topics. All of the major woodworking tool companies are usually represented, which makes this a great place to compare tools side-by-side before you let go of the cash.
This year’s show is Friday, February 8th from 12-6pm, Saturday, February 9th from 10am -6pm and Sunday, February 10th from 10am-4pm. The woodworking show is big – smaller than it used to be, but still big. If you have ever thought about building something out of wood, you will enjoy the show. Unfortunately, and quite surprisingly, there isn’t a lot of wood at the show, but there are a lot of tools, and all of them are for sale. This is a selling show, not just a “see how cool the tools are” show. Plenty of attendees will be filling their trucks with tools that they have waited until now to purchase.
I remember the first time I went to this show and was amazed at how many woodworkers are out there. I, of course, was looking at it from a lumber producers viewpoint and only saw a huge ocean of potential customers, and every one of them spending money like crazy. From then on, I was hooked. I go to the show every year (lately, to man the St. Louis Woodworkers Guild booth), and I am still amazed at how many people are woodworkers or are dreaming about woodworking. If you are in one of these two groups, go to the show. You won’t be sorry. And, don’t forget to take your wallet!
Click here for full details on the St. Louis Woodworking show.
The Kreg Jig: Is It Real Woodworking?
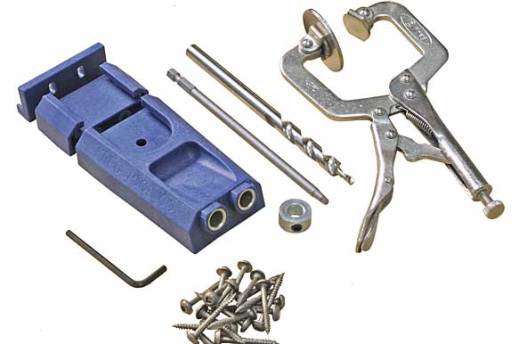
I am finally willing to admit it – I use a Kreg jig. I use it regularly and I like it. I don’t use it everywhere, but I am finding more uses every day, and it scares me a little. I am a woodworker, a custom woodworker. I use time-honored joinery like mortises, tenons and dovetails. It doesn’t feel right to add the Kreg jig to the list. I can’t and won’t do it. It isn’t real woodworking. Or is it?
I haven’t decided, officially. Used in the right places it is totally acceptable in my mind. For face frames, nothing is faster, the joints are tight and, with a little glue added, strong and stable. And, since the face frame is joined to a cabinet box it gets extra help in the support department to keep everything in place. So, it’s fine on face frames. What about the cabinet boxes that the face frames attach to?

The “Rocket” is the Kreg jig that I use.
I say O.K. The boxes get support from the walls and I use regular screws all the time, so pocket screws must be acceptable (as a footnote, I like to screw cabinets together when possible, so that I can take them apart for “design changes”). Face frames, check. Cabinet boxes, check. What about furniture? Maybe something very much like a cabinet or cabinet box, just not attached to the wall? Now, it starts to get really murky. Officially, out loud, I say no way. Furniture must be assembled with furniture joints, not pocket screws. Then I ask myself why and I don’t have a great answer except that it doesn’t feel right. Assuming that the pocket screw joint is just as strong as a “real” woodworking joint it shouldn’t really matter, but it does. I feel if I take the quick and easy way out, I am less of a woodworker. I can’t get past it.
Here’s the thing that is odd to me. I think that the Kreg jig works great and all of their products (at least the one I have used) are top-notch. I, especially, like their screws. It may not seem that important, but their screws are the best. I use them whenever I can, even when I am not using pocket holes. They never strip out or break, and they are self-tapping. Their drill bits are well made and stay sharp for a long time. When I was working on opening my new shop, Kreg products were the first ones to come to mind to have for sale. It’s clear that I like them, but I still think, in the back of my mind, that they aren’t for real woodworkers.
To this day, I will make sure that the Kreg jig and screws are always with me, but I won’t always use them. Weird?
What do you think? Please leave a comment.
Wood Sculpting – A Different Approach to Woodworking
I have found a way to make myself worry less about woodworking and enjoy it even more. It all started when I got into doing more rustic work, especially on wine cellars, where perfection can look less authentic. Since I knew that the parts didn’t need to fit exactly, I used fewer jigs and did more freehand work. And, surprisingly, parts were still fitting together quite nicely. I stopped worrying about it so much and just did it. The entire process was more fun and had a much better flow to it. I would keep working instead of worrying about working or making jigs to help me work.
I was thinking of it more as woodsculpting. I was starting with a big chunk of wood and used various tools to whittle the wood away until a finished piece appeared. I used saws to remove wood in straight and curved lines, chisels to remove wood from odd angles, and even sandpaper to remove very small chunks. If something was too small I would glue chunks of wood together to make it bigger and then sculpt some more.
Now, as woodworkers we think of straight cuts as normal. Try to think of the straight cuts as a bonus and the freehand work as normal. Stop worrying about how to make a jig for every little move of your router and grab a chisel. You know where your line is, just find ways to work up to that line. Cut a tapered leg with a bandsaw (leaving the line) and sweeten it up on the jointer. No one is going to check to make sure that all your legs match perfectly. Use a scraper to make a small piece of moulding instead of buying a $50 router bit that you will only use once. Or, use a chainsaw to cut a thick chunk of wood at a steep angle, then straighten it out with a belt sander. There are plenty of places in your woodworking where mathematical precision isn’t necessary (ask anyone who has a 42” wide tabletop that finished at 41”). The key is that it looks good and fits together when you are done, however you get there.
I think you will find that when you start to think about your work as woodsculpting it will open up more doors than you ever imagined. It will give you more options, and make your woodworking less scary, more rewarding and enjoyable. And, if you do mess something up, don’t worry and just grab another piece of wood. After all, this stuff does grow on trees.
What’s Going on at WunderWoods

Everyone always asks what I do. Here's the answer. Click on the photo above for a short video tour and see all of the steps it takes to go from a tree to finished furniture.