Look at the Finish with Your Hands
Finishing wood has several benefits, with the main one being protection. Finished wood is protected from contaminants and other fluids (especially water) that could ruin the piece. Finishing wood also makes the piece look more beautiful than a raw piece of wood. It adds depth and brings out details that would be completely hidden otherwise. Finishing wood also makes a piece just seem, for lack of a better word, finished, like someone cares, like it is more valuable. A good finish is nice and smooth and begs to be touched. Reaching out and touching a finished piece of wood seems to be an instinctual way to determine the overall quality, like smelling your food before taking a big bite. I can tell you from lots of personal experiences that the first thing customers do when they see a newly finished piece of furniture is to reach out and touch the wood. They are using their eyes to look at it at the same time, but they are doing half of their looking with their hands. With that in mind, I would suggest that you do at least half of your looking with your hands when finishing a piece of wood.
Your hands can tell you so much about a surface that your eyes can’t. First of all, you can feel lots of places that you cannot see, whether it simply be hidden from view from a lack of light or from a lack of access or maybe just that it is in a bad position at the time. A great example of all of these is on chair work. A chair is meant to be seen from all angles and there are usually lots of intersecting surfaces headed in all directions, with many hidden from view.
Your hands can also feel things in plain sight that your eyes might never see. This is especially true for clear finish coats. If you don’t have big, obvious, light-reflecting mistakes in a well-lit shop, they may not show up enough to see – that is until after you deliver it to your customer and they put it right in front of their big bay window, the one that is similar to the bay window you don’t have in your shop.
I use my bare hands continually through the finishing process. Combined with a low, raking light to help highlight imperfections, they create a dragnet that catches anything trying to make its way into the finished pice. And, the best part is that my hands never miss, they feel everything (except color).
Get your hands involved early in the finishing process, even during rough sanding and surface preparation. During this phase your hands will let you know if there are any dents or chips that aren’t obvious enough to see, and they will give you an overall feel for the surface, how smooth it is and if there are any unflat areas that need to be straightened out. It will give you a good idea where you need to spend more time sanding and point out areas of raised grain that you could never see with your eyes alone.
After you have finished sanding, use your hands, while you are blowing off the surfaces with compressed air, to wipe the surfaces clean. Your hands will loosen particles that would otherwise stick and the air can blow them away. In lieu of tack clothes (which I don’t own anyway), I always use this method, just wiping my hand on my pants as I go. While you are cleaning the surface, without noticing it, you will also be looking at the surface with your hands. You will feel anything that wasn’t adequately sanded the first time, and have a chance to take care of it before you are in too deep.
Your hands are also fantastic for work in-between finish coats too. At this point, the surface and color should be in great shape and any issues should be small and almost undetectable, except with your hands. After scraping or sanding the first sealer coat, use your hands to help clean the surface for the following coat, just like you did before applying the first coat of sealer. While you are wiping off the dust (and wiping it on your pants), you will feel any dust nibs or rough patches or even runs while you are working. Your hands will tell you everything you need to know about the quality of your surface and how you are progressing.
I usually apply one or two more coats of finish, each of which requires less work, but every one involving my hands to make sure the surface is ready for the next step. In fact, I use my hands so much that I am pretty sure I could do my work in-between finish coats without even using my eyes (insert your own joke here, I teed it up for you).
The next time you are working on a finish, get your hands more involved. Try to use your hands as much as your eyes to recognize what is going on with the surface, even in places that are hidden from view. You will be amazed at how much you can “see” with your hands.
Proper Ratio Mixing With Improper Tools
Sometimes in life you need a tool that you don’t own, don’t have handy or don’t have any idea where it is. I have this problem a lot and it is usually closely related to the fact that I don’t put my tools back as I use them. I subscribe to the “leave it close to where it is most likely to be used next” method of organization, which somehow, always leaves a tool a long way from where it is actually needed next.
I had this same problem when setting up to spray a two-part conversion varnish finish. I had all of my supplies, but no empty cottage cheese containers to work out my ratios. You don’t have to use cottage cheese containers, but I always had some handy and had used them consistently after I figured out how high the finish should be in the container and how much catalyst to add. The mixture is actually pretty simple–one batch of finish, plus 10% catalyst.
One thing I never liked about my cottage cheese container system was that I had worked out how much I needed for a full pot on my spray gun, but beyond that it wasn’t easily adjustable. If I only needed a little finish, I didn’t have a system for figuring that out. A scale would have worked great, or even measuring cups would have been nice. Heck, anything related in any way to weights and measures would have helped. But I am never that prepared.
So, there I was, looking around the shop for empty containers and finding none, but I had a revelation. One of the containers I did find had some old finish in it, and I could see the level of the finish inside the container by looking through the white plastic, and I realized that I was just inches away from having a measuring cup, except my cup didn’t have any measurements on it. No good – right? Actually, not so bad. I could make up my own measuring system (inspired by Bill Cosby and his story about Noah, I call them cubits) and mark them on the side, if I could just find an empty container.
Then the wandering begins, looking around the shop for something that might work. Then the digging begins, as I move everything in my finishing area to try and uncover an empty container. Then the cussing begins as I still find nothing to mix the finish in before I put it in my spray cup. Then… Wait! Hold on a minute! My spray cup. That is the one and only, now very clean and very empty container in the shop, just waiting to have something put in it.
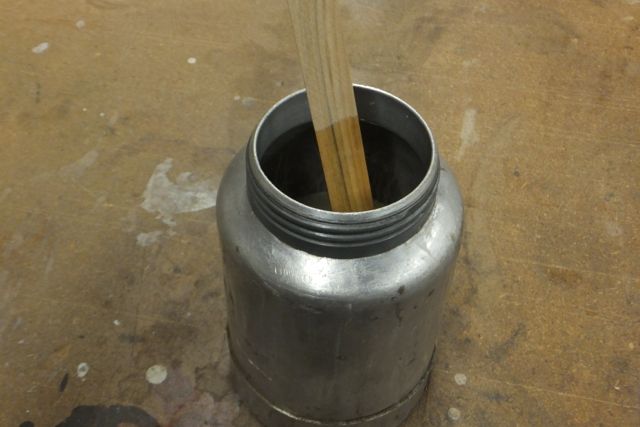
Now, I am really on to something, but I can’t see through the aluminum cup to mark my cubits on the outside. If only the cup was clear. I needed a way to see how much was in the cup without being able to see through the cup. I needed some sort of stick, something that you dip in fluids (I don’t know what I would call that thing). And, you know what would be even more awesome? If whatever I used could always be found and be something that I would never have to worry about putting away. Yes, an actual stick of wood as a dipstick. Genius.
But wait, it gets even better. Since the stick didn’t have any measurements on it, I could make my own and make a different one for each batch. I could make any adjustments I needed . All I had to do was transfer my cubit measuring system to the stick, and I was in business.
I labored a bit over my cubits and how long they would be. They couldn’t be an inch because that name was already taken. Same with a half an inch and a quarter of an inch. Any measuring system I was going to use was based on an inch and that’s just not how cubits work. Everyone knows that no one knows how big a cubit really is, so it couldn’t be based on anything that already exists. The good news for the cubits of the world is that I still can’t tell you how long they are, but luckily it doesn’t matter.
The first step was to fill up my cup with finish. With the new fancy cubit ratio measuring system it didn’t matter how much I used, just as long as it was enough to do the job. Then I walked less than two feet and grabbed the nearest, short scrap of clean wood and dipped it in the finish. The highest point on the stick to get wet was now the new cubit.
I marked the high point (cubit) on the stick with a pencil and then marked a second point 10% higher to indicate how much catalyst to add. There are two ways to figure where the 10% mark goes. The most accurate way is just to measure the length of your cubit, say 5 inches and multiply by .10, which equals .5 or 1/2″. I like this method because it’s accurate and uses just a tape measure and simple math, but it isn’t as simple as it could be. My new and improved method (though admittedly slightly less accurate) is to, by eye, divide my cubit in half, then in half again, and then in half again. At that point I have a mark that is about 12.5% of the full cubit. Then again by eye I deduct a few percentage points so I am in the 10% range, and then transfer that mark to the top side of the cubit line. It takes no tape measure and no math.
Here’s a quick rundown of the process:

Start by dipping a clean stick into the finish. Be sure to touch the bottom.
Pull the stick out of the finish, so that you can make your first mark.
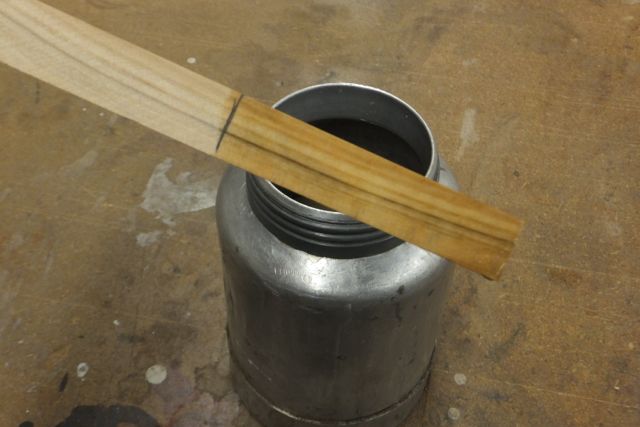
Make your first mark at the top of the fluid. This is also known as one “cubit” for fun.

Divide the space in half by eye and make a mark. This is 50%.

Divide the 50% section in half, again by eye. This is the 25% mark.

Divide the 25% section in half by eye to get a 12.5% mark.

Make a mark a few percentage points above the 12.5% mark, which will be about 10%. Move that same distance above the “high-level” mark and make your sixth and final mark.

Put the stick back in the cup, making sure it touches bottom. Fill to this mark with catalyst for a 10% mix.
The new and improved, super-simplified, cubit measuring system works for any fluid mixing in a straight-sided container and is accurate (as long as you aren’t blind). It is simple simon and knocks the whole process down to a stick and a pencil. And, if I can’t find those two things buried in the shop somewhere, then I am really in trouble.
What’s Going on at WunderWoods

Everyone always asks what I do. Here's the answer. Click on the photo above for a short video tour and see all of the steps it takes to go from a tree to finished furniture.