Simple Green is super mean (in a good way)
 When I think of green products, especially a green cleaner, I think of something that is nice to the environment and nice to dirt. I imagine a product that tries harder to make me feel better about using it than it does about getting the job done. Now, I am not in a hurry to damage the earth, but if I have to choose, I often lean to the more manly and more toxic.
One of my favorite toxic substances is lye. It is mean, and if you want something to melt any organic substance you can think of, lye is it. Lye is the main ingredient in Drano drain cleaner, and it removes clogs by dissolving the most common culprit – hair. I also know that it burns skin and while I use it to darken cherry, if left on too long and too strong it will actually dissolve the wood.
Now that got me thinking. I have used oven cleaner in the past to clean saw blades; it did a good job dissolving the wood stuck to the blades and it burns my skin. With those two things in common, there just might be lye in the oven cleaner. It doesn’t really matter what is in the oven cleaner, but it started to make a stronger connection in my head between lye and using it as a cleaner to remove wood and wood pitch that gets stuck to every high-speed tool in the shop.
I got very excited and very sidetracked and started using lye to clean everything, and it worked great. The most impressive use of the lye was on belts from my wide-belt sander. At $40 a pop the sanding belts are hard to part with, especially when I know the only thing wrong with them is that they are full of pitch. In the past, I had used the rubber sticks that are specifically built to clean sanding belts and there were always spots that wouldn’t come clean, but not with the lye. In just a matter of minutes, even the nastiest chunks of burnished and burnt wood streaks melted away and left me with a like-new belt. Luckily, the sanding belt itself seemed rather impervious to the lye.
I couldn’t believe it. There was only one thing left to do – go to YouTube and see if anyone else knew about this dramatic new finding. I didn’t find anything for cleaning big belts, only ideas for smaller belts and none of them mentioned lye. I couldn’t believe that no one had come up with this yet. Lye was the ticket. But as I soon found out, it wasn’t the Holy Grail.
The more I searched the internet to see what others were saying about lye, the more I came across what I assumed were the granola’s of the earth pushing Simple Green to clean saw blades. I thought sure, if you want your saw blades cleaned sometime this year then go ahead. Then I read a few more posts about the virtues of Simple Green and eventually I couldn’t ignore it, so I tried it.
Simple Green worked great on my saw blades. They cleaned up as quickly as they would have with lye or oven cleaner – WHAT? I truly couldn’t believe it. No way on God’s Simple Green earth was it going to beat the muscle-bound, knee-busting power of my good friend lye. There was only one way to find out, so I put them in a head-to-head test on a belt of wood-clogged sandpaper from my wide-belt sander.
I am sure you can tell from the title that Simple Green had more than a good showing. Simple Green worked just as well as lye – absolutely no difference. If a spot needed to soak a bit with lye, it needed to soak the same amount with Simple Green, with the added benefit of not melting everything it touches. I don’t know what is in that stuff, but it works.
Lately, I have even been using it in my drip system on my sawmill. In the past (when my sawmill was outside) I would resort to using diesel to keep the blades clean on pitchy wood, like pine. It worked, but at the end of the day everything felt extra dirty and smelled like diesel, which is the exact opposite of how it should smell when cutting fresh wood, especially pine. Just a little Simple Green added to the water in my drip system keeps the blade clean and the shop smelling fresh. It really is amazing how well it works.
Simple Green, who knew?
Widebelt Sander Gets Straightened Out
I went shopping for new tools last year after my fire. One of my best finds is a 36″ AEM (now TimeSavers) widebelt sander, affectionately known in the shop as the “FriendMaker”. It is a 20hp wood-eating machine that is in great shape for its age. I would say it is perfect, or at least now I would. The only problem that I found after I ran it was a groove or three in the front sanding drum. I didn’t know a lot about this sander and told myself that it would be alright if the drum wasn’t flat because the platen, which is a flat bar that presses the sandpaper to the wood would smooth things out. And it did (kind of), when it wasn’t falling apart.

The TimeSaver was costing me time (and money) with these deep grooves.
The platen is a piece of aluminum about 37″ long and 1-1/2″ wide. It has a piece of stout felt attached to it that is covered with a separate piece of graphite fabric. The graphite reduces the friction and allows the machine to apply pressure to the backside of the sandpaper without burning through everything. The sander had the platen in it when I got it, and I assumed that it should be in there all the time, so I used it all the time. I was getting decent results, even with the grooves in the front drum, but I was going through graphite and felt quickly. I had to baby the machine and the graphite was still wearing out. I finally broke down and called TimeSavers to talk to a tech guy.
The good news was that the tech guy knew what he was talking about. The bad news was that he assumed I did to, even after I told him that the machine was new to me, that I had never used it or one like it before and that he should assume that I knew nothing about it. It took me close to a half an hour of going back and forth to finally figure out that it isn’t necessary to use the platen all the time. If I wanted, I could run it without the platen. Well, now I was listening (not that I wasn’t before). Turns out that the platen is for finish sanding and shouldn’t be used to take off more than .005″ at a time. It was for smoother grits, like 150 and up. The platen spreads out the sanding pressure to keep the sanding scratches from going too deep. Good to know.
Now things started to make sense. I had read that my sander could take up to 1/8″ per pass on rougher grits. That was a crazy number compared to .005″, and I am all about crazy. If I could take that much off at a time it would be a real game changer for me. The problem I faced with my new aggressive sanding technique was that the front drum, which is rubber coated, had those grooves in it that I mentioned earlier. Smaller pieces could run through and avoid the bad spots, but bigger pieces couldn’t. And many times the smaller pieces would drift into the zone with the groove and come out with high spots. I wanted to fix it, but it looked like a daunting task. There is no obvious way to get the drum out, and I had heard that redoing the drum would cost thousands. As much as I am all about crazy, I am also about cheap. Thousands for a resurfaced drum was not in the cards for a machine that I got for $2,500.
So, I coasted. I used the sander almost every day and tried to avoid the bad spots. I even put the platen in when it was vital for the part to be flat. No matter how careful I was, parts would still come out with hidden ridges, the sneaky kind that only show up in the finish, when you want them the least. I kept coasting until, out of pure coincidence, the guy that sold the exact machine to the original owner stopped by my shop trying to sell me new machinery. He asked me how the sander was working, and I told him about the drum and the grooves that were ruining my life. He casually mentioned that I could “dress the drum” if there was enough of it left. He took a look at it and assured me that I could fix the drum on my own. All I had to do was search the internet for info and videos on “dressing the drum”.
Searching I went. No videos. The only thing I found was one posting on WoodWeb about how to dress the drum. I was really hoping for a video because I wasn’t in a hurry to destroy the drum and mandate the purchase of a new one. However, the one posting was all I could find. I read it and it made sense, so I stopped looking and decided to give it a whirl. It ended up being quite easy and intuitive. I just never would have thought of sanding the rubber drum on my own, but once I knew it was an option it all made sense.
Because I couldn’t find a video on how to do it I decided to make my own. I’ve been wanting to start making videos because I think the videos can be a lot clearer than still shots. I don’t like seeing or hearing myself, but I decided it is something I just need to work through. So, here it is, my video on “Dressing the Drum on a Widebelt Sander” (just click the photo of the sander below). Next up is a full-time, non-judgemental cameraman.

Click the photo above to see how to dress a drum on a widebelt sander.
The premise of the whole event is that a flat board covered with sandpaper is sent through the machine (with the sanding belt removed) and sands the rubber drum smooth. It starts with a new 36 grit sanding belt and a piece of 1/2″ thick MDF with radiused leading edges. The width of the MDF is determined by the throat opening of the machine and what is the widest piece that will fit through it. In my case, it is about 39″ wide. The length of the MDF is based on the width of the sandpaper minus 2″. The minus 2″ is so the paper can completely cover the two radiused edges. My paper is 37″ wide, so the MDF is 35″ long. The new sanding belt that is applied to the MDF runs at a 90 degree angle or perpendicular to the way it normally runs. Doing this allows the MDF to be a little wider than the drum and to be sure the drum gets completely sanded on each pass. The key is to have a wide, flat, consistent-thickness sanding block to send through the machine. After the MDF and sandpaper are cut, apply the sandpaper to the MDF with spray adhesive (3M SUPER 77) and trim everything flush.
I was instructed on WoodWeb to use a high feed speed, low grit and very shallow cuts since the rubber could just melt instead of being sanded. It didn’t take long. I took light passes and was done way before I got the video shot. In all, I only sent the MDF sandpaper block through 10 times to remove the 1/16″ deep grooves.
Now, I use the drum all the time and never use the platen. I consistently and confidently take of 1/16″ or more per pass (even on wide stuff) with the 36 grit and 1/64″ with the 100 grit. It is amazing how different my life has been since I “dressed the drum” on my sander.
The Kreg Jig: Is It Real Woodworking?
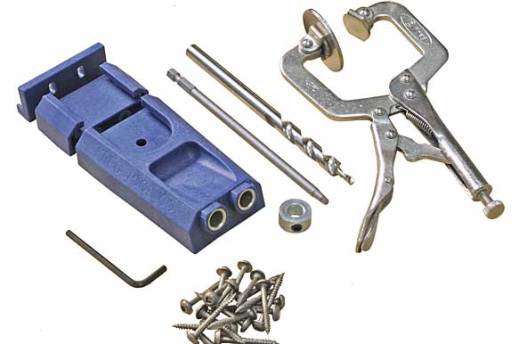
I am finally willing to admit it – I use a Kreg jig. I use it regularly and I like it. I don’t use it everywhere, but I am finding more uses every day, and it scares me a little. I am a woodworker, a custom woodworker. I use time-honored joinery like mortises, tenons and dovetails. It doesn’t feel right to add the Kreg jig to the list. I can’t and won’t do it. It isn’t real woodworking. Or is it?
I haven’t decided, officially. Used in the right places it is totally acceptable in my mind. For face frames, nothing is faster, the joints are tight and, with a little glue added, strong and stable. And, since the face frame is joined to a cabinet box it gets extra help in the support department to keep everything in place. So, it’s fine on face frames. What about the cabinet boxes that the face frames attach to?

The “Rocket” is the Kreg jig that I use.
I say O.K. The boxes get support from the walls and I use regular screws all the time, so pocket screws must be acceptable (as a footnote, I like to screw cabinets together when possible, so that I can take them apart for “design changes”). Face frames, check. Cabinet boxes, check. What about furniture? Maybe something very much like a cabinet or cabinet box, just not attached to the wall? Now, it starts to get really murky. Officially, out loud, I say no way. Furniture must be assembled with furniture joints, not pocket screws. Then I ask myself why and I don’t have a great answer except that it doesn’t feel right. Assuming that the pocket screw joint is just as strong as a “real” woodworking joint it shouldn’t really matter, but it does. I feel if I take the quick and easy way out, I am less of a woodworker. I can’t get past it.
Here’s the thing that is odd to me. I think that the Kreg jig works great and all of their products (at least the one I have used) are top-notch. I, especially, like their screws. It may not seem that important, but their screws are the best. I use them whenever I can, even when I am not using pocket holes. They never strip out or break, and they are self-tapping. Their drill bits are well made and stay sharp for a long time. When I was working on opening my new shop, Kreg products were the first ones to come to mind to have for sale. It’s clear that I like them, but I still think, in the back of my mind, that they aren’t for real woodworkers.
To this day, I will make sure that the Kreg jig and screws are always with me, but I won’t always use them. Weird?
What do you think? Please leave a comment.
Where The Metal Meets The Wood: Sauer And Steiner Woodworking Planes

Konrad Sauer stood pateintly in the corner waiting for his chance to speak about handplanes at a Lie-Nielsen hand tool event. A couple of other guys were up before him and seemed to have more to talk about and more to show. Konrad had a couple of his tools sitting in front of him on a bench and was just hanging out, no big hubbub, no big show. Just a man and a couple of his wares for sale – well sort of. The tools that were for sale, weren’t so much for sale, as they were for selling. Konrad brings them along to start the conversation, and to start to get you to believe that you need one of his tools. The beauty of it is that he doesn’t have to do a thing. All he has to do is hand you one of his tools and the world around you starts to become a little fuzzy. The room starts to spin in a circle. Not in a bad way, but in a way where everything else just becomes noise and the only thing that matters is this beautiful marriage between metal and wood that captures all of your focus. And, while you are staring at this work of art and trying to figure out how one mortal human being armed with just a few hand tools pulled off such a feat, Konrad tells you about the history of handplanes and how he is inspired by previous great toolmakers. While he talks, it is only possible to pick up a few more tidbits of information before he hands you the next one. And then again, nothing else matters at that point, except for the tool in front of you. Now, you are sold.
It doesn’t matter if you are a tool lover or not. Anyone, young or old, male or female, wood junkie or not, would find these tools just as awe-inspiring. They have heft and solidness, grace and beauty, and a level of craftmanship that is unrivaled. And, to think that every piece is hand cut, fitted, and finished is truly amazing. The mix of polished metal and figured wood makes each one feel like a piece of jewelry – a piece of jewelry that just so happens to produce it own little works of art in the shape of ultra-thin curls of wood.
Konrad’s work is beautiful, and while I don’t want this blog to be just a bunch of reposts of others work, I felt I just had to share photos of the tools from Sauer and Steiner. Most of us will probably never actually own a $3,000 dollar hand plane, but they sure are nice to look at, enjoy!


Read more about these amazing handplanes, and see more about the process at http://sauerandsteiner.blogspot.com
The Best Tape Measure Ever
I have been through a lot of tape measures. I either lose them, break them or loan them out to measure lumber and they inadvertently end up in someone else’s pocket. I have tried to combat these loses in many ways. I thought I had the system beat when I used Craftsman tape measures. They worked well, weren’t too expensive and when they broke I could get them replaced for free. But, that didn’t do a thing for the ones that I just lost outright. So, outsmarting the system again, I went with the $2.00 tape measures from the paint store. They were pretty good for two bucks, and at that price I could by six at a time and not have to worry about losing them or breaking them or letting someone borrow them for a very long time.
During this $2.00 phase, I also tried other tape measures. At Woodcraft, they sold a flat tape measure designed for more accurate marking. That intrigued me. I always felt like the curve of the tape measure felt a little inaccurate, a bit too forced. Maybe this flat thing was the way to go. It did lay flat on the board and I felt like my marks we accurately transferred. Other than that, I wanted to burn the thing. After working forever with a tape measure that had a backbone it was impossible to work with a spineless substitute. When I pulled out the tape and wanted it to extend just a foot beyond my reach, it would just curl up into a ball. Hate, hate, hate.
At the same time my $2.00 tape measures were quickly fading. They were 16′ long, but not very wide. They were easily bent and creased, the numbers wore off, the springs locked up, and still, I couldn’t part with them. They weren’t totally dead, so I couldn’t justify pitching them, but they were getting worse by the day. So, it came down to decision time. What to do? Six more $2.00 tape measures, a new Craftsman, or maybe something altogether different?
A friend that I worked with at the time, had a Stanley Fat Max that he always used. I never used it because it was so big. It seemed like it would always be in the way and pull down my pants with the weight. Plus, I didn’t need to carry around a 25′ tape all day, every day, since the longest thing I usually measured was 16′. I convinced myself that I was a medium-sized tape measure guy anyway, more delicate perhaps, but not some hack carpenter with a crazy-big tape measure. But… more and more guys had the Fat Max. And not just guys. Danielle, a female carpenter that I worked with on several jobs was carrying the Fat Max. So, I checked it out. $25-$30. Pass. Weeks go by. Check it out again. Still $25-$30. I’m a cheap skate. Pass. Head to the paint store.
Then Christmas comes along. Christmas is a time for gift cards to the Home Depot (at least for me) and the quandary that follows. Do I buy stuff for my business, or not? I opt for not, but I never know what to buy. I want to purchase something for myself that I normally wouldn’t, but at the same time I want it to be something that I will use. For a lot of woodworkers, it is usually a hand tool that is nicer than necessary, and for me it was the Fat Max Extreme. It was chrome-coated plastic and looked like a million bucks. It was fat with a PH and still $25-$30. I took it home, unable to believe that I spent that much on a tape measure. Buyers remorse set in. In no world, was I going to get that much value out of a stinkin’ tape measure. That was two years ago and that tape measure is still going strong.

Here's what a new Stanley Fat Max Extreme looks like.
I have others as back up, but I might as well only have one. I will search high and low for it, even when I have the backup in my hand. It is no longer as pretty as it used to be on the outside, but it still works awesome. It will extend out 11′ without flopping to the ground. That may not seem like a big deal to us fine woodworkers, but it comes in handy every day. The tape is strong overall and doesn’t easily bend (mine has no creases yet). The tape itself is super bright and well-coated so the numbers don’t rub off. And, one of the things I like the most is one that I was sure I would hate – the big tongue. That tongue is strong. I have dropped my tape measure countless times and the tongue is just as square as the day it was made. It just measures accurately day after day. All my other tape measures have mangled tongues that only get me within plus or minus 1/16″ of an inch.

Here's what mine looks like.
The Fat Max is by far the best tape measure ever. It solved all of my problems. It is accurate and rugged, so no more busted tape measures. I like it so well, that I don’t let anyone borrow it, so no more walking-away tape measures. And, here’s the kicker. Since it is so expensive, I always know where that thing is, so no more lost tape measures.
20″ Planers: Powermatic, Grizzly And Others All Made By Geetech. Who Knew?
Powermatic, that’s my brand. My, “If I find it for the right price, I will always buy it, even if I don’t need it,” brand. Powermatic has long been synonymous in the woodworking industry with “awesome.” In the table saw category it was always between the Delta Unisaw and the Powermatic 66 for the ultimate saw, the one that guys waited until they retired to afford. The one that made it possible to get through those last years of work, knowing that they would soon have one in their shop.
Powermatic planers are no different. If I find a Powermatic planer for the right price, I will snatch it up, knowing that I can always sell it for a profit. A few years ago, when the economy was still good, I bought a 20″ Powermatic planer for $700 and sold it on Ebay for $2,300. Good times. Real good times.
The concept is simple. Rock-solid tools, made in the USA. They sell themselves. Boy, do they sell themselves. They even sold me. Boy, did they sell me.
I was operating my shop with a 20″ planer from Sunhill machinery that I bought pretty early in my career for about $1,200. I still used it because it always worked fine for me and I didn’t want to spend the money to replace it. Until, one day, when a friend of mine mentioned that his 20″ Powermatic was just too big, and he was looking for a smaller machine. This was my chance to get the Powermatic into my shop. I worked out a deal where I would sell mine for $800 (which I did), buy him a new 15″ Grizzly for about $1,200 (which I did), and get the Powermatic for no additional money (which I did).
I had pulled it off – The “Great Powermatic Switcharoo.” I verified that it was like new, that it had a 5hp motor compared to my 3 hp and that it had faster feed rates, which meant that I would just put boards in one end and watch money fly out the other. There was no doubt that this was going to change my life… until I actually picked it up.
I walked into the shop, squinting because of the bright halo of light surrounding the machine sent from heaven. I stumbled closer, feeling my way through the maze of tools, until I could just catch a glimpse of the one and only – same damn machine I just got rid of. It wasn’t the exact same, it was painted gold instead of blue, and it did have a bigger motor and I assume a different pulley for faster feed speeds, but it was the same machine. Need I even say, it wasn’t exactly what I was expecting.
Somewhere along the line, Powermatic just gave up and bought the same planer from Geetech in Taiwan/China that is sold by Grizzly and others. They did take the time to change the paint, which I am sure accounts for the extra $1,000 you will spend if you don’t buy the Grizzly machine. I was floored. It is one thing to have your equipment made overseas from your own designs and meeting your own specifications, but they just jumped on the back of their great reputation and decided to ride into the sunset, hoping no one would notice. I am sure it makes life easier. Now, all Powermatic needs is a sales force and someone to make sure Geetech doesn’t brag too much about the equipment they are making for Powermatic.
I’m really not mad. The machine worked great until I burned it up with my other tools. It was stronger and faster, and I liked the color better. I just didn’t like getting blind-sided like that. I would have been mad if I had spent the extra money for the Powermatic instead of buying it from Grizzly.
For fun, I put together a little slide show of the Geetech machine in all of its different paint colors. See a resemblance?
Once You Go Impact, You’ll Never Go Back

A friend of mine is a tool junkie. He has at least one tool for every job. Often he has more than one. This is especially true for cordless drills. He has about fifteen of them and most of them are DeWalt. Many times I would have my drill out, within easy reach, with the right bit in it, and he would still go get his. He never used my drill, or at least never wanted too. He called himself a drill snob and I agreed. My Porter Cable was a fine drill, worked with no problems, and only had recently become weak in the battery department. Why wouldn’t he use my drill? Turns out it wasn’t my drill that he had problems with, he had become used to using his drill and impact driver combo. Apparently, the two together were a deadly combination. His said his drill was good, but the lethal blow was handed out by the impact driver. I blew him off at first. It was just another tool. It was just more money to spend. It was just another trophy for his case.
Then I used it. It was fast, strong and light. I couldn’t believe how well it worked. Here’s the thing – the impact driver doesn’t just drive screws. It kicks their butts and asks for more. It starts out fast, driving the screws at maximum speed until it hits enough resistance. Then the impact kicks in and it beats it home. It does all of this without stripping the head or breaking the screws. The best part is that when you are driving screws from odd angles, especially above your head, it takes about half the force to hold it in place. And did I mention, it doesn’t strip the head. It is unbelievable!
Now, if I don’t have an impact driver with me I find myself thinking, “This is how they used to do it in the olden days.” Sure, it works. You can drive screws with a drill. But once you go impact, you’ll never go back.
Note: I have since used a Bosch, Makita and Hitachi, as well as the DeWalt, and all have worked great. The key seems not to be in the make, but just in the fact that it is an impact driver. If you were to purchase one, I would only recommend to get one that matches the batteries you already have.


What’s Going on at WunderWoods

Everyone always asks what I do. Here's the answer. Click on the photo above for a short video tour and see all of the steps it takes to go from a tree to finished furniture.