Open House Celebrates 25 Years of WunderWoods Custom Hardwoods
On Saturday, October 18th from 8am-2pm we open our doors to celebrate 25 fantastic years of custom woodworking, live-edge slabs, hardwood lumber and great customers. Join us for a hot dog and a Coke and a chance to win a walnut slab valued at over $500 (just for showing up). We will also have fun games with great prizes and demonstrations of crowd favorites like the sawmill and cnc router. We hope to see you there.

What’s So Great About Sapele?
I use Sapele (sə-PEE-lee) lumber pretty often. I use it much more than you would think considering I mill my own lumber (which I would argue makes it almost free) and I have to buy Sapele. When it showed up on a recent bill from our lumber wholesaler, my wife/accountant who tends to question my purchases asked, “What’s so great about Sapele? I thought walnut was the best.” Well, after ordering even more for a recent door job, here are the reasons I came up with to defend my purchase:
- The Look. Sapele or Sapele mahogany is just pretty, like mahogany. It is a nice rusty red color which darkens and gets richer with age. Usually the lumber is quarter sawn which creates a ribbon striation in the grain. And, the chatoyance (light reflectivity variation), just wow!
- Takes stain great. As nice as Sapele is, sometimes the project calls for the wood to be stained. This semi-ring-porous wood accepts all stains evenly. Really, it is hard to mess it up.
- Durable. Use Sapele inside or out – it doesn’t matter. The wood will last a long time either way.
- Affordable. Sapele sits at about the same price point as a middle of the road domestic lumber and is cheaper than walnut.
- Stable. Sapele lumber is usually quarter sawn, even without specifying, which makes for some very cooperative wood.
- Wide and long. I’ve never seen a Sapele tree, but they must be huge. The lumber is often wide and commonly available in lengths over 12′.
- Machines well. Sapele isn’t quite the perfect wood to work with (it is sometimes a little chippy), but it is up there with our favorites. By the way, my favorite to work is sassafras.
- Not too heavy. For an imported and durable wood, Sapele is quite light in weight. Pick up some Bubinga and you’ll see what I mean.
I’m sure that there are even more reasons that will pop in my head after I post this, but let’s just say I like Sapele a lot – enough to go out and buy it when I am already surrounded by “free” wood.

Click on the YouTube link above to check out our latest door project
and to see the great Sapele lumber in action.
All About That Brass
It looks like brass is back in – bright, shiny, golden brass. The last few jobs we have done featured plenty of brass, and they have been for customers who I would say are “in the know” for design trends. The styles are less decorative than previous iterations, but I am surprised by how quick it is back. It seems like just yesterday we were taking out everything that resembled brass and replacing it with oil-rubbed bronze. I guess there are only so many choices, and brass isn’t a bad one.
A great example of the brass trend roaring back are a couple sets of cabinets we have done lately which featured brass, not only in the hardware choices, but also added to the cabinets. We have previously done a set in black and just recently a set in walnut. The brass inlay is a fancy touch which isn’t too hard to pull off, but there are a few tricks which we figured out through a bit of trial and error.
The first set of doors and drawer fronts set we did were made from mdf with the grooves routed on the cnc router. We used 1/8″ thick brass and super glued them in the grooves after we chiseled the corners square. It worked well, but we planned to sand the entire panel in the wide-belt sander and that’s where things went a little sideways. Even with the lightest and quickest of passes, the brass would get hot and expand and then pop out of the grooves. We were able to finish up by hand, using a block backer behind the sandpaper, but the process took quite awhile. Luckily, we were only doing a handful of doors. In case you are wondering, the orbital sander was a no-go because the brass and mdf sand at different rates and the orbital sander would leave the brass high and the mdf low, resulting in a non-flat surface. The only way to ensure a flat surface is with very even amounts of sanding through the wide-belt sander or with a stiff backer behind the sandpaper.

On our most recent set of walnut cabinets, I decided to step up the brass to 1/4″ x 1/4″ and it made a huge difference. We were able to put the panels through the wide-belt sander (still taking light passes) and have that be our almost finished surface. We then very, very lightly sanded with the orbital sander just to get the brass surface finished consistently, but had no issues with the brass wanting to pop out of the grooves. The structural difference between 1/8″ thick and 1/4″ thick brass and its ability to dissipate heat, both added to the success. I think it also helped to have more glue surface on the side of the brass to keep them in place.

The walnut panels were a bit easier to finish than the black set because the entire panel was only clear coated for the finish. The black set required us to tape off the brass before painting black and then clear coating the entire panel. To get a perfectly flat finish, the black set also took a few extra coats of finish with 320 sanding in between to level out the surface.
Besides the brass hardware, brass is finding its way back in fixtures and accent pieces too. We found ourselves also working on a set of brass and walnut shelves to accompany the cabinets above. It seems like the brass is coming back and designers are not being shy about using it. Take a good look around the internet and you’ll find brass, and it will be as big as ever.

We’re all done in New York
We finally did it! After several months of work and me saying, “This is the last trip” a few too many times, we have finished up our install of the True Residential Refrigeration showroom in Manhattan. When this started I hadn’t been to New York (when I was old enough to remember), and now I can get from St. Louis to the job site in just a few hours and not even look up from my phone. It’s crazy to think what a difference a few months can make!
While we where finishing up we shot our last video for the job, which is below. Watch until the end (or just fast forward) to see the final product. Now, it’s time for some good ol’ toasted ravioli.

I Shouldn’t Complain About Not Having Enough Space
New York has a lot going on and a lot going for it – space is not one of those things. If you are not a people person, it probably isn’t the city for you. If you like to have room to work and a place to put your stuff, it definitely isn’t for you. Luckily, I am used to working in a tight space with a lot going on, and I don’t mind it. It doesn’t speed anything up, but as long as everyone isn’t too grumpy, working in tight quarters can be kinda fun and exhilarating. It only becomes less fun when it is time to get your stuff done and there is no way to actually get to it.
Our first installation trip in New York had both the joy of working closely with all of the other trades and the exasperation of having those same people in your way most of the time. I often feel like our shop is too small, but after going to New York and having 15 guys, a truckload of cabinets, a bunch of fridges and everyone’s tools in 1,200 sf. of showroom, I feel like I should shut up about it.
Click on the video below to see how much stuff we were able to put in a 5 lb. bucket.
“Hey Buddy, I’m Walkin’ Here!”
Well, we got our cabinets to New York, off the truck and up to the 6th floor job site, but not without some excitement. I didn’t get it on video, mostly because it’s not easy to video while everyone is yelling at you, but I can tell you it would have made for some great TV. Will he get the truck unloaded on time? Will the other contractors let him live? Will the honking ever stop? All of these questions and more will be answered on the next episode of “This May Not Have Been a Good Idea”.
It started out great. The driver was there by 6 a.m. He pulled a magnificent u-turn in the corner intersection and got into the loading dock rather expeditiously, and everyone was joyous.
The marching orders from our general contractor were to get in early, claim your spot, unload the truck and ignore everyone else. That’s not really how it normally works for me, but hey, I’m in New York. You do what you got to do, and we did it. The first 30 minutes went great. Everyone we saw was still riding the adrenaline high of getting the truck in the loading dock. Then the mood started to change.
Other contractors in the building began showing up, early mind you, and couldn’t get in because we were in the way. Pedestrians started heading for work, also early, and couldn’t get by. Drivers trying to beat the rush could only use one lane. I know it’s hard to picture here in suburbia where we are used to having space.
We unloaded the truck as fast as we could, but it wasn’t fast enough. The yelling picked up and so did the honking. It seemed like everyone was on the phone talking to somebody else about how they were trying to speed up the process and get us out of there. Finally, the employees in charge of the loading dock said we were out of time and made our driver pull out and park in the street.
We focused on the truck. We got him unloaded and out of the way and at least stopped the honking. At that point I thought we were on easy street. The truck was gone and more than half of the stuff was up to the job site. All we had to do was get the rest of it up the freight elevator, and we had all day to do it. Wrong again. Turns out freight can’t be delivered after 8 a.m., so as not to disrupt the other businesses in the building. Fine concept, I just didn’t know about it. I have never worked in a building where the freight elevator can only carry freight before 8 a.m.
Right at 8 a.m. one of the building managers, popped out of the freight elevator, violently waved her arms as though she was calling a runner safe at second and yelled, “No more, no more!” She disappeared back in the elevator and we stopped moving. I didn’t know how to handle this one.
We stood there in the basement for awhile, knowing we had to do something. The freight elevator is big and we decided that if we got one more shot at it we could fit everything else. So, we went New York style, loaded up the elevator, made sure we got it in one load and headed to the 6th floor. We did not see the building manager and had everything officially off of the elevator and in the job site before 8:20 a.m., just a little past curfew.
Then our general contractor turned his phone back on.
Apparently, you just need to get used to people yelling at you when you work in NY.
How to Find the Center Without Doing the Math
Anyone who knows me knows that I don’t like to follow convention. I swear I don’t do it to be ornery (though my wife might disagree), I just enjoy viewing things from different angles. I always take a different route when I can and like to approach life the same way. One of my differing viewpoints is on measuring. For some people the measurement is the measurement and that’s it. For me, not so much. It doesn’t seem like much of a hill to die on, but I think it is at least worth discussing. Measuring with tape measures and using some system like imperial or metric to communicate those measurements with others is important, but it isn’t the only way to accomplish many tasks. One of the most common places to subvert mathematical conventions is in dividing spaces evenly, and a great example is finding the center of a piece by dividing a space in two.
Finding the center with math can be simple – half of 24″ is 12″. But, it can be hard too. Real quick, tell me the center of 157-13/16″. The answer will take some math and possibly a calculator to get to 78.90625″ or 78-29/32″, and then you need to find that on a tape measure – more math to figure out that 29/32″ is just between 7/8″ and 15/16″and isn’t even marked on your tape measure. The conventional approach would be to do the math, mark the measurement, and double check the math by measuring from each side to verify that the center mark is the same distance from each edge. But, I am here to tell you that you can skip the math part.
The measurement or the actual number on the tape measure is somewhat arbitrary at this point. All that is needed is for both halves to be the same, whether or not it lines up with a mark on a tape measure doesn’t matter. Think of it like this, that center point is going to be in the same place no matter what measuring system you use. The measuring system is just a way for you to communicate a number from piece to piece or to someone else.
So, how do you find the center without doing the math? The answer is pretty simple. Skip the math part and just go straight to the verifying part. All you need is a tape measure and one good eye. Here’s how to do it:
1) Look at the piece and put a mark in what looks to be the center. Maybe you have a great eye, maybe you are done.
2) Measure to that mark from one side. It will most likely be a wacky, non-conformist number like 28-15/16″, plus a skosh. Simplify your life and move that mark to something easy and something on the tape measure, in this case 29″.
3) Measure from the other side towards the center and mark 29″ again. Now you will have two marks on your piece. If you have a good eye, those two marks will be very close together. If not, pick another number that will get those marks closer together. For example, those two marks might be about 6″ apart, so add 3″ or subtract 3″ (depending on if they overlap or not) to each side and remark. Now they will be close together. Still no math.
4) If you are only roughly splitting the piece in two, it is easy enough to eyeball and mark the center at this point, since there is very little distance between the two marks. If you need to be accurate, just change your measurement a little. If your marks are about 1/2″ apart, change it by 1/4″ on each side. At some point the numbers will be exactly the same or they will be 1/16″ or less off. Once you get to that point, you have no choice but to eyeball it and put a mark in between the marks.
I love to use this system and smile a little bit inside when I do it, feeling like I know some secret no one else does. I know it’s not the case, but I still think it is fun to find the center without all the official math. Heck, I could even do the same thing with just a random stick if I needed too. On a recent project, I was cutting it very close on length and needed to make sure my layout was in the middle of the slab, and I got a chance to use my “no measuring” system again, and this time I got it on video. Check out the following video where I show my measuring marvel in real life:
What to Look for When Purchasing Used Lumber
I buy what I would call “used” lumber (even though it may not have been actually used) on a somewhat regular basis. Most of my purchases have come from barn finds because I like to buy in larger quantities and lots of barns are sitting out there with big stacks of lumber in them. I make sure to only purchase if the price is right because I have learned the hard way that the lumber is never as good as everyone thinks it is or wants it to be. And, there are many reasons for this:
- Not cut from high-grade logs: The lumber is cut from whatever logs were available at the time. There may have been some high-grade logs (from the bottom of the tree) in the mix, but there were definitely also low-grade logs (from higher up in the tree). This means the lumber will have more knots and other defects. In the hardwood industry, logs are sorted by grade. Low-grade logs are milled to make low-grade products, like railroad ties and pallets. They aren’t even milled at grade sawmills.
- Wood is more precious to the owner: Wood that should be trimmed off was kept simply because they weren’t ready to let it go and it didn’t hurt anything to keep it.
- People involved in the lumber production are not professionally trained: Usually the owner of the logs and the sawyer they employeed do not know enough about sawmilling to produce the highest quality lumber. Many sawmill owners do not understand how to cut for grade lumber, and even if they do, they are often given direction from the log owner to maximize yield and not grade. Beyond that, cutting for grade involves flipping the log in the sawmill many times, requiring more work and more time, so those steps are often skipped.
- Lumber hidden in a stack is always lower grade than everyone remembers: After the lumber is cut and tucked into a stack, it looks higher grade. It’s too easy to forget about defects and only remember the perfect boards.
- Lumber is cut thin and inconsistent: Often (almost always) barn find lumber is cut a little thin and inconsistent. People ask for 1″ thick lumber and the sawyer delivers, even though commercially produced 1″ thick (4/4) lumber is cut at 1-1/16″ to 1-1/8″ thick. Lumber rough cut right at 1″ thick often doesn’t dry, joint flat and plane entirely to 3/4″ or more in thickness. As well as being cut thin, the lumber is usually cut inconsistently – a result of inexperienced sawyers, poor-performing equipment and no real need to worry about consistency of cutting. It’s not easy (and more work) to make sure all of the lumber coming off of a sawmill is the same thickness from end to end of each and every board.
- Best boards already used: This one is self-explanatory and obvious. You would use the best boards first too. It just makes sense that the lumber which remains may not be the best boards out of a log.
All of these reasons explain why the lumber won’t be as good as you would hope, but it is also helpful to see examples of what makes lower grade lumber. Click on the video link to see a recent batch of walnut I purchased and what I found in the stack. And, remember when purchasing used lumber, just don’t pay too much.

Old Orange Kitchen Cabinets Get Updated
We recently delivered a live-edge maple slab door to a customer and there was a lot of talk about making sure the maple wasn’t too yellow. She had her maple floors refinished as part of her house remodel and she was worried about the color of the new maple door. It wasn’t too much of an issue because the maple slab had an array of colors, including black epoxy, but when we were installing the door it became clear why she was worried about the color. Turns out she had a kitchen full of maple cabinets which had turned amber orange over the years and now clashed with the refinished maple floors.
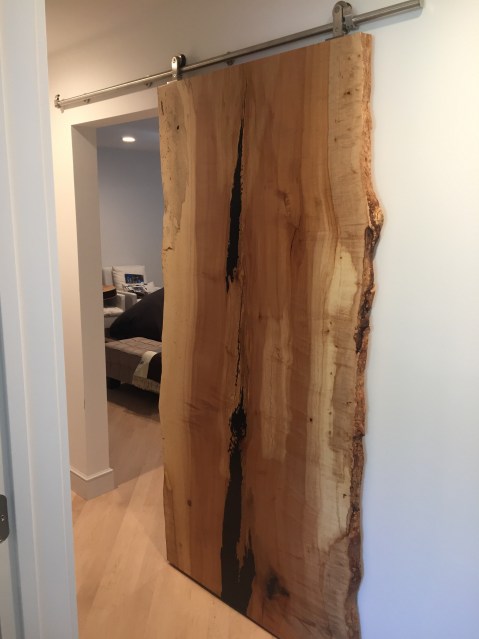
I saw what she saw – bright white, newly and expertly refinished maple floors underneath old, crusty and orange maple cabinets. The cabinets were still in decent shape but they definitely needed some help to not look so old. She picked the right day to ask if there was anything that could be done about the color because I was riding high from a successful install of a very cool door and there was no way I was going to act like I couldn’t do it.
I wasn’t sure exactly how I was going to go about it, but I knew it would start with sanding. And, since everything in the kitchen, including the crown moulding was made from maple-veneered panels with an mdf core, I spent a lot of time very carefully sanding. After I had my parts sanded to an even and much lighter color, I started to apply the Raw Sealer finish from Basic Coatings. I chose this finish for one main reason, and that is because it is the exact same finish the flooring company used. I could have used another water-based finish with a white additive, but I figured why fight it? Use what they used on the floor and I should have the best chance of matching it.
The Raw Sealer has a very small amount of white added to it and I found that I wasn’t getting enough white in the finish until I was up to about six coats on my test pieces, so I decided to add some more white. I added enough white latex paint (about two tablespoons per quart) until the finish was the right amount of white in two or three coats instead of six. The white paint added brightness and covered the yellow orange of the maple, and it will work to retain the original color since the paint won’t yellow. It worked like a white wash for the cabinets and really did the trick.
The most difficult part of the job, besides the tedious sanding, was applying the finish with the white added. It needed to be applied evenly, so I needed to make sure my gun was working great and so was I. There were a few times where the color didn’t look too even or the gun sprayed a little wacky, but I was able to quickly wipe that panel off with a wet rag before the finish dried and reapply.
I spent a lot of hours on this job (more than budgeted, of course), but I think it came out great and I might even be convinced to do it again someday in the distant future. Click on the video link to see what I started with and how it all ended up.
Festool Domino Connectors Pull It Together
About two years ago we started using Festool Domino connectors in the shop because we were working on a trade show display which needed to pack flat for shipping. The metal connectors are made specifically for this occasion, and if you have ever put together a piece of breakdown furniture (think Ikea), you have probably used something similar.


The connectors work great, fit into a normal Domino slot and are easy to use, but since they do require an access hole to tighten the lockscrew, they can’t be used everywhere. And, just like a Kreg screw connection, there will be never-ending discussions about whether or not this is “real woodworking”. Regardless of how real they are, the connectors have found a place in our shop and recently we found another great use for them.
Jeff, our building and finishing extraordinaire (he can do it all), was working on a desk which came together at some funky angles and decided to try the Domino connectors for alignment and clamping, and it worked great. The corner joint, which he glued together, lined up perfectly and pulled together tightly. Previously, we used other variations of under counter hardware an/or wacky clamping setups to pull the joint together and they always seemed a bit amateurish, like we were just making it up as we went, and often we were. But, not now.
Now, we are using the Festool Domino connectors not only for pieces which need to breakdown, but also for connecting and clamping those hard-to-clamp joints. And, just recently, we built a big walnut bar which required both, in the same piece. We had several joints which needed to clamp together permanently, and since the bar was very big and U-shaped, it needed to come apart in the corner to be assembled on site. The Domino connectors worked perfectly in this case, and I am sure you will be seeing more of them in the future.
Click on the video below to see how the project came together and how the connectors made it all possible.
What’s Going on at WunderWoods

Everyone always asks what I do. Here's the answer. Click on the photo above for a short video tour and see all of the steps it takes to go from a tree to finished furniture.