Proper Ratio Mixing With Improper Tools
Sometimes in life you need a tool that you don’t own, don’t have handy or don’t have any idea where it is. I have this problem a lot and it is usually closely related to the fact that I don’t put my tools back as I use them. I subscribe to the “leave it close to where it is most likely to be used next” method of organization, which somehow, always leaves a tool a long way from where it is actually needed next.
I had this same problem when setting up to spray a two-part conversion varnish finish. I had all of my supplies, but no empty cottage cheese containers to work out my ratios. You don’t have to use cottage cheese containers, but I always had some handy and had used them consistently after I figured out how high the finish should be in the container and how much catalyst to add. The mixture is actually pretty simple–one batch of finish, plus 10% catalyst.
One thing I never liked about my cottage cheese container system was that I had worked out how much I needed for a full pot on my spray gun, but beyond that it wasn’t easily adjustable. If I only needed a little finish, I didn’t have a system for figuring that out. A scale would have worked great, or even measuring cups would have been nice. Heck, anything related in any way to weights and measures would have helped. But I am never that prepared.
So, there I was, looking around the shop for empty containers and finding none, but I had a revelation. One of the containers I did find had some old finish in it, and I could see the level of the finish inside the container by looking through the white plastic, and I realized that I was just inches away from having a measuring cup, except my cup didn’t have any measurements on it. No good – right? Actually, not so bad. I could make up my own measuring system (inspired by Bill Cosby and his story about Noah, I call them cubits) and mark them on the side, if I could just find an empty container.
Then the wandering begins, looking around the shop for something that might work. Then the digging begins, as I move everything in my finishing area to try and uncover an empty container. Then the cussing begins as I still find nothing to mix the finish in before I put it in my spray cup. Then… Wait! Hold on a minute! My spray cup. That is the one and only, now very clean and very empty container in the shop, just waiting to have something put in it.
Now, I am really on to something, but I can’t see through the aluminum cup to mark my cubits on the outside. If only the cup was clear. I needed a way to see how much was in the cup without being able to see through the cup. I needed some sort of stick, something that you dip in fluids (I don’t know what I would call that thing). And, you know what would be even more awesome? If whatever I used could always be found and be something that I would never have to worry about putting away. Yes, an actual stick of wood as a dipstick. Genius.
But wait, it gets even better. Since the stick didn’t have any measurements on it, I could make my own and make a different one for each batch. I could make any adjustments I needed . All I had to do was transfer my cubit measuring system to the stick, and I was in business.
I labored a bit over my cubits and how long they would be. They couldn’t be an inch because that name was already taken. Same with a half an inch and a quarter of an inch. Any measuring system I was going to use was based on an inch and that’s just not how cubits work. Everyone knows that no one knows how big a cubit really is, so it couldn’t be based on anything that already exists. The good news for the cubits of the world is that I still can’t tell you how long they are, but luckily it doesn’t matter.
The first step was to fill up my cup with finish. With the new fancy cubit ratio measuring system it didn’t matter how much I used, just as long as it was enough to do the job. Then I walked less than two feet and grabbed the nearest, short scrap of clean wood and dipped it in the finish. The highest point on the stick to get wet was now the new cubit.
I marked the high point (cubit) on the stick with a pencil and then marked a second point 10% higher to indicate how much catalyst to add. There are two ways to figure where the 10% mark goes. The most accurate way is just to measure the length of your cubit, say 5 inches and multiply by .10, which equals .5 or 1/2″. I like this method because it’s accurate and uses just a tape measure and simple math, but it isn’t as simple as it could be. My new and improved method (though admittedly slightly less accurate) is to, by eye, divide my cubit in half, then in half again, and then in half again. At that point I have a mark that is about 12.5% of the full cubit. Then again by eye I deduct a few percentage points so I am in the 10% range, and then transfer that mark to the top side of the cubit line. It takes no tape measure and no math.
Here’s a quick rundown of the process:

Start by dipping a clean stick into the finish. Be sure to touch the bottom.
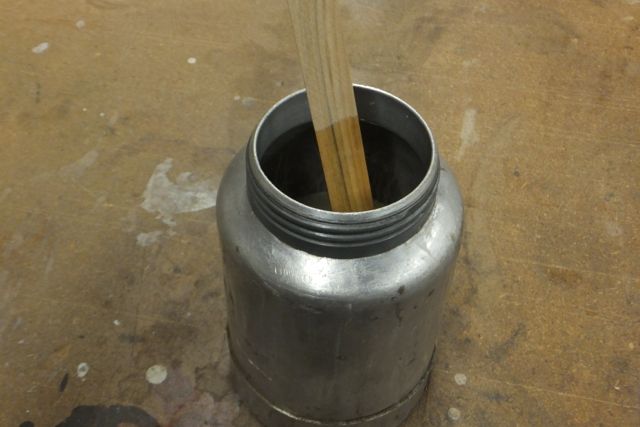
Pull the stick out of the finish, so that you can make your first mark.
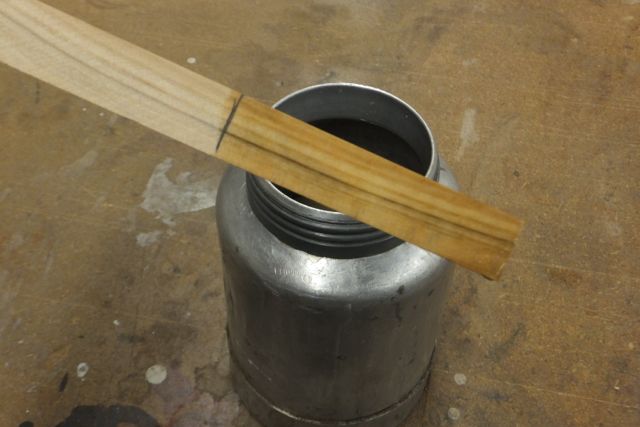
Make your first mark at the top of the fluid. This is also known as one “cubit” for fun.

Divide the space in half by eye and make a mark. This is 50%.

Divide the 50% section in half, again by eye. This is the 25% mark.

Divide the 25% section in half by eye to get a 12.5% mark.

Make a mark a few percentage points above the 12.5% mark, which will be about 10%. Move that same distance above the “high-level” mark and make your sixth and final mark.

Put the stick back in the cup, making sure it touches bottom. Fill to this mark with catalyst for a 10% mix.
The new and improved, super-simplified, cubit measuring system works for any fluid mixing in a straight-sided container and is accurate (as long as you aren’t blind). It is simple simon and knocks the whole process down to a stick and a pencil. And, if I can’t find those two things buried in the shop somewhere, then I am really in trouble.
Stop Thinking About Buying A Spray Gun
All of the woodworkers I know like the woodworking part, but most of them dislike the finishing part. They have a great time using their tools to craft something beautiful and useful and then get paralyzed when it is time to wrap it up. They want it to come out perfect, or at least really good, and are sure that they are going to mess it up. Usually, they have tried applying a finish with a brush, or a roller, or a cloth, or all of the above and more, and the results were never great. It is possible to get a good finish with a brush or any of the above, but it isn’t easy and usually comes up short of perfection.
In the quest for a better finish, many woodworkers ask me about spray guns and spraying in general. They are looking for a better finish, a finish that is easier to apply, and a finish that makes their hard work shine. Their reasons for not already owning a spray gun are numerous, but when I am asked if they should purchase a spray gun, my answer is always a loud and excited, “YES!”, followed by, “What in heck are you waiting for?”

I have owned two Fuji Q4 HVLP systems like this with a bottom-feed gun, and both worked great.
On my list of essential woodworking tools, a spray system ranks near the top, only after a table saw, jointer, and planer (and, logically I suppose, after sandpaper). I use a spray gun on nearly every project and for a multitude of reasons, with the main reasons being quality of finish, speed, speed and speed. Quality of finish is self explanatory, but the triple speed thing may need a bit more description.
With a spray gun, the application is fast (speed #1). From spraying stain to applying the last coat of finish, the spray gun can move some material quickly. There is no faster way to get finish from the can to a project, short of just dumping it on. If the gun is working well and the finish is flowing nicely, I can often put down finish as fast as I can move.
The spray gun also allows me to use fast-drying finishes (speed #2) like lacquer or conversion varnishes, which are impossible to apply any other way. With lacquer products, the finish is often hard enough to sand and be recoated in just 15 to 30 minutes, compared to a full day with oil-based polyurethane. Lacquer dries so fast, that I often spray parts just before heading to an install, throw them in the bed of my truck, and they are ready to install by the time I get to the job site. It can’t get much faster than that.
The best part for me, not being the most fastidious of woodworkers, is the time it takes to prep the spray area when using lacquers (speed #3). Besides covering areas from potential overspray, there is no prep required. I usually spray right next to my table saw or anywhere that I have room in the shop and do nothing about the dust. I just blow off the piece I am about to spray and get on with it. The finish dries so fast that dust doesn’t have time to get in it. I literally do nothing before I spray, even if I am standing in a pile of sawdust (the piece I am spraying is on sawhorses and not in the pile of dust, of course). I would never even think of working like this using something like an oil-based polyurethane, which seems to pull in dust from everywhere. (Quick note: I do use the gun to spray slow-drying finishes too, but the spray area needs to be clean and dust free, and I would prefer to skip that here in the speed, speed, speed section.)
Besides the above four advantages, I am often asked additional questions when it comes to spraying, but I must warn you, the answer to all of them is still, “Buy a spray gun!” Here are some of the most common questions:
- Can I spray ________ with it? Yes, YES, yes, yes and YES! You can spray any liquid finish by changing its viscosity and/or your spray tips, if needed. It is no different from a brush – a spray gun is just a vehicle to move finish from the can to the project.
- I don’t have anywhere I can spray inside. Can I spray outside? I think outside is the best. Spraying outside requires no exhaust fans and usually provides ample space to work. Plus, it is just nice to be outdoors. I often move outside to finish large projects, or if I am out of room in the shop and need to spread things out. The best outdoor spot is a garage (with the door open), which has good ventilation, controlled wind, and a shield from the sun – a lot like an actual paint booth.
- What about the fumes when I spray indoors? Yes, there are fumes when spraying solvent finishes, but they can be dealt with quickly and easily. First, spray near a window with a fan in it (instant paint booth). Second, wear a mask while spraying. Third, don’t spray when your wife is home.
- Won’t the overspray get on everything? Sort of. The spray gun will shoot finish beyond the workpiece (overspray), but most of it will land in the form of dust. Fast drying finishes like lacquers dry almost instantly in the air, so only overspray close to the workpiece is wet and sticky. Even the overspray on the floor directly beneath the sawhorses just sweeps up.
- Isn’t a spray gun a pain to clean-up? No. If you stick to solvent-based finishes, like lacquer, that dissolve with lacquer thinner you only need to clean-up when the gun isn’t working right and then only by soaking the parts in lacquer thinner. If I am spraying lacquer, I treat the gun just like a can and leave the finish in it until the next time I spray. If you are using finishes that aren’t soluble after they dry you can’t be so cavalier, but it still isn’t a big deal. Often, it is only a matter of spraying the solvent through the gun until it is clean.

The Apollo turbine HVLP, shown here with a gravity-feed gun, is another spray gun I have used which produces great results.
After I berate someone for not already owning a spray gun and then tell them over and over again to buy one, the next question they ask is usually, “Which one should I buy?” My answer is simple, “Not a cheap one.” I have used several different high-quality, name-brand HVLP spray systems, and all of them did a good job. There are, of course, subtle differences in the way the guns work and some may be better than others, but none of the higher-priced systems will be a bad purchase. I have personally used HVLP systems from Fuji, Apollo and Graco, and all of them give similar results. At the same time, it is worth noting that I have used cheap no-name guns, and they were painful to use. The spray was splotchy and the guns would only put down a wet finish in the very center of the fan pattern compared to the entire width of the fan pattern from a good gun.

This Graco 2-quart pressure pot system I currently use is an older model, but gives good results. With a newer system expect a smaller gun and an even better spraying.
When selecting an HVLP gun there are lots of choices, and again, as long as you don’t buy a junk gun they are mostly just different, and not necessarily bad. I currently use an older HVLP system made by Graco. It has a turbine and a small compressor that pressurizes the 2-quart pressure pot for the gun. I use a pressure pot because it holds more finish, so I can refill less often and keep moving. Plus, with the pressure pot system the gun profile is small to fit into tight spots. For most uses and especially for those of you that don’t even own a gun, one without a pressure pot is fine, leaving you only to decide on two items, the type of gun (bottom-feed or gravity-feed) and the air delivery system (air compressor or turbine).
As far as the guns go, I prefer the bottom-feed gun because it holds more finish, and since it is the type of gun I started with, it just feels right. At the same time, I know several people who use gravity-feed guns with no complaints. They like that the gun is a little lighter and fits in smaller spaces, and they don’t mind refilling as often. Between the two there really is no bad choice.

These Graco Airpro HVLP spray guns are a good example of guns that run on compressed air. They are available (from left) in a bottom-feed gun, a gun for use with a larger pressure pot, and a gravity-feed gun.
The air delivery system is the other area to focus on when deciding which system to purchase. The guns can either be powered by an air compressor or a turbine, and you get to choose which makes the most sense for you. Again, neither is wrong or bad, just different. First off, do you own a large compressor (5 hp, 50-gallon tank)? If you do, and you don’t need to be portable, you can save some money and just buy a gun. If you don’t, I wouldn’t recommend buying a big compressor just to spray. I would spend the compressor money on a turbine unit because it is very portable. I know I often take my gun with me to the job site or just outside, and I appreciate not having to lug around a giant compressor just to spray.
Here are the key decision points to address when purchasing your new system:
- Do you already own a large compressor and don’t need to be portable? If you already own a large compressor you can save money by only purchasing a compressed air gun. Don’t buy a big compressor just to spray, spend the money on the more portable turbine system.
- Would you like to use your spray gun outside of the shop, maybe at the job site or at your house? Turbine systems are the lightest and most portable. If you need to take your spray gun with you, pick a turbine. If you are only spraying in the shop, either a turbine or compressed air system will work.
- Are your jobs big? Bigger jobs (full kitchens, for example) require more material and may benefit from a system that can hold more finish. If you are spraying very often or are consistently spraying large jobs, think about a system with a pressure pot. Otherwise, stick with a gravity-feed gun or bottom-feed gun. Note that even large jobs can be sprayed without a pressure pot, but will require more refills.
- Do you have extra money? Here’s your chance to spend it. None of the good spray guns are inexpensive. Expect to pay $800-$1,000 or more for a complete turbine system. And, remember, don’t buy a cheap one.
If you have been thinking about buying a spray gun, stop! There is no reason (except for money) to think about it anymore. Start living your woodworking dream and buy one. No one, and I mean no one, has ever been unhappy knowing that they had a good spray gun to use whenever they needed it. You will use it so much more often than you think, and, though a good spray system is expensive, it may make you actually enjoy finishing.
If you have any concerns about using or purchasing a spray gun, let me know below in the comments section. I am certain that I can allay any of your fears and maybe even answer a question or two.
What’s Going on at WunderWoods

Everyone always asks what I do. Here's the answer. Click on the photo above for a short video tour and see all of the steps it takes to go from a tree to finished furniture.